Buying a TIG Welder
Buying a TIG welder can look daunting at first, because there appears to be so many different makes, models and options available?
- What can I afford, do I go cheap or expensive?
- Do I need DC or AC/DC?
- How often will I use it, occasional or business use?
- How expensive a welder do I want?
- Is there features you must have?
Before all the different controls and technical terms scare you off, it’s not actually too bad choosing a TIG Welder, if we break everything down into three separate groups:
- Group 1 – What Are You Going to Weld?
- Group 2 – Transformer or Inverter?
- Group 3 – What Goodies do I Want?
The topics listed below should help you decide what type of machine, and what options you may need…
Here’s a Complete List of the Individual Topics:
- TIG Welding – DC or AC/DC?
- Transformer or Inverter?
- Enhancements & Controls:
- Consumables:
- What Else do You Need?
- Other Considerations:
- The Cost…
- Image Gallery:
Group 1 – What Are You Going to Weld?
TIG Welding – DC or AC/DC?
Do I need AC/DC or just DC?
There are basically two types of TIG welders. These are:
Selecting the type of output required… DC, or AC/DC is fairly straight forward:
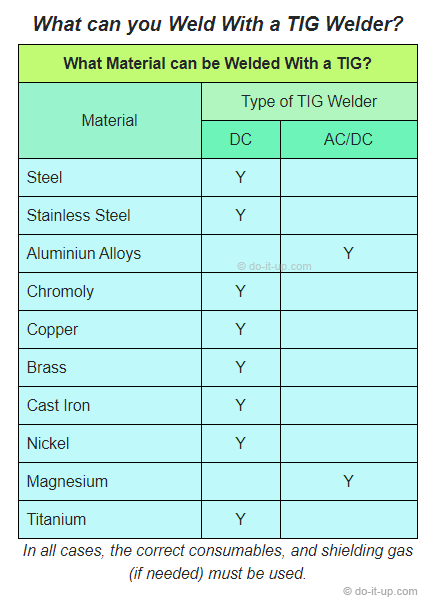
- Do you need to weld Aluminium and Magnesium alloys?
If you don’t need to weld Aluminium and Magnesium alloys, then you don’t need an AC\DC TIG welder. The table below shows the differences:
What can you Weld With a TIG Welder?
| What Material can be Welded With a TIG? | ||
|---|---|---|
| Material | Type of TIG Welder | |
| DC | AC/DC | |
| Steel | Y | |
| Stainless Steel | Y | |
| Aluminiun Alloys | Y | |
| Chromoly | Y | |
| Copper | Y | |
| Brass | Y | |
| Cast Iron | Y | |
| Nickel | Y | |
| Magnesium | Y | |
| Titanium | Y | |
Group 2 – The Type of Transformer?
TIG Welding – Transformer or Inverter?
Do I need a Transformer or an Inverter?
There has always been a lot of discussion on which is better. In the early days, a transformer type TIG welder was often better. But with the vastly improved quality of modern electronics in the last 20 years, it now simply comes down to your own preference and what machine you can afford?
So why are there two different types of transformer welders..?
Transformer Type TIG Welders:
A good quality transformer (copper windings) designed with a high duty cycle can perform continuously, with no let up. Often they will be:
- Used in an industrial setting.
- Heavier and less portable.
- They may not have so many of the fancy controls and settings.
- They often have some power ‘Grunt’ behind them, (for the bigger jobs)!
- They have the aura of ‘a good solid piece of engineering’…
Inverter Type TIG Welders:
Surely a little thing like that can’t weld that? Often smaller, with lots of dials and buttons!
- Smaller and more portable.
- They can have a ton of options (dependant on price).
- Have a multitude of settings (a tweakers paradise).
- Are versatile (dependant on the machine you buy), and can switch between TIG, Stick welding and Plasma cutting.
- Has the aura of fancy modern design, often with loads of knobs, buttons and digital displays…
Welding – What is the Difference Between an Inverter and a Transformer?
To weld materials, you want to change the AC input supplied from the socket on the wall, to a lower voltage, (but higher current) DC output. To do this, you:
- Transform the voltage.
- Increase the current.
- And then rectify the AC to DC.
The basic difference:
- A transformer based machine uses a large, heavy transformer.
- An inverter based machine uses electronic components, which allow the use of a smaller, much lighter transformer.
A Transformer Based Welder…
Will transform the AC supply from the wall socket into a lower AC voltage, but with a higher current. A rectifier then converts this new lower AC voltage, (higher current) into the required DC output.
An Inverter Based Welder…
Uses high-power semiconductors, (a ‘Switched Mode Power Supply’). The Inverter switches the supply on and off very fast, changing the frequency of the device (increasing it). Increasing the frequency allows for a much smaller transformer to be used. The smaller transformer converts the supply to a lower voltage, higher current. This is then converted into DC using a rectifier.
Note:
Sometimes the DC is converted back to a low voltage, high current AC for use in particular applications (like welding Aluminium and Magnesium).
Group 3 – What Goodies do I Want?
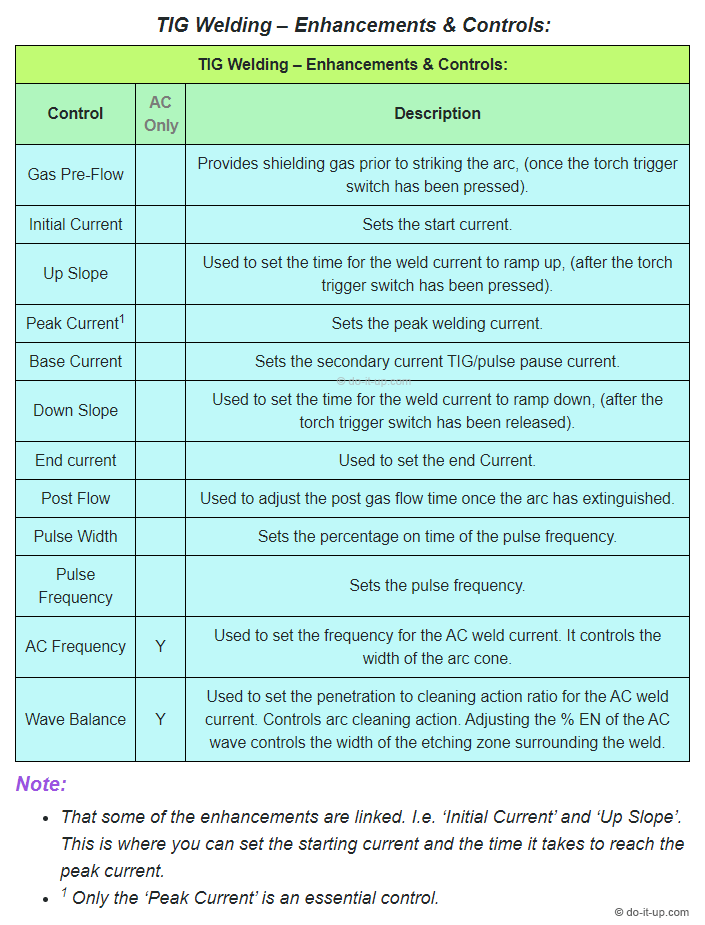
TIG Welding – Enhancements & Controls:
To further complicate things, TIG welders can have a whole load of different controls and enhancements. The table below gives a brief description of what they are, and the image gives a visual explanation of what they do…

TIG Welding – Enhancements & Controls:
| TIG Welding – Enhancements & Controls: | ||
|---|---|---|
| Control | AC Only | Description |
| Gas Pre-Flow | Provides shielding gas prior to striking the arc, (once the torch trigger switch has been pressed). | |
| Initial Current | Sets the start current. | |
| Up Slope | Used to set the time for the weld current to ramp up, (after the torch trigger switch has been pressed). | |
| Peak Current1 | Sets the peak welding current. | |
| Base Current | Sets the secondary current TIG/pulse pause current. | |
| Down Slope | Used to set the time for the weld current to ramp down, (after the torch trigger switch has been released). | |
| End current | Used to set the end Current. | |
| Post Flow | Used to adjust the post gas flow time once the arc has extinguished. | |
| Pulse Width | Sets the percentage on time of the pulse frequency. | |
| Pulse Frequency | Sets the pulse frequency. | |
| AC Frequency | Y | Used to set the frequency for the AC weld current. It controls the width of the arc cone. |
| Wave Balance | Y | Used to set the penetration to cleaning action ratio for the AC weld current. Controls arc cleaning action. Adjusting the % EN of the AC wave controls the width of the etching zone surrounding the weld. |
Note:
- That some of the enhancements are linked. I.e. ‘Initial Current’ and ‘Up Slope’. This is where you can set the starting current and the time it takes to reach the peak current.
- 1 Only the ‘Peak Current’ is an essential control.
Only one of the controls listed above is essential (and will be fitted as standard). So, all the other controls may be at an additional cost. If needed, you may be able to reduce the cost of a TIG welder, by limiting the features that are supplied with it. Or, you could compare the different brands against the features supplied with each machine (and their purchase cost).
Consumables:
Consumables are often a side issue, but important when buying a TIG welder. You will probably need some consumables to start welding (check what’s supplied with the TIG welder?).
Note:
You need to ensure the consumables fit the TIG torch (gun) you intend to use (see the article: TIG Torch – The Different Types: for more detail).
Some of the consumables (such as Tungsten electrodes) may be specific to the material you intend to weld. Some are sized according to the thickness of the material being welded, (see the article: TIG Welding Torch Parts & Consumables: for more detail).
Check what consumables (torch parts) are supplied with your TIG welder (if any?), so you know what you might need to get started.
The article below “What Else do You Need?” gives some more detail…
What Else do You Need?
A TIG welding set isn’t all you need to get started…
There maybe additional equipment you need to purchase: (links open in a new tab)…
- Shielding gas – Of the correct type for the material to be welded). Note: Pure Argon can be used for multiple materials when used with TIG welding (steel, stainless steel, aluminium (aluminium & copper alloys)).
- A valve (regulator) – For the gas bottle (to control the gas flow).
- Tungsten electrodes – Different types are used for different processes.
- Filler rods (wire) – The correct type for the material to be welded (can be purchased in differing quantities).
- Consumables – The Torch (if supplied with a TIG welder) may come with some consumables (gas cup, gas nozzle, collet, back cap, etc). Check what’s supplied to get you started?
Additional info: (opens in a new tab)…
Other Considerations:
This section highlights some additional items you may want to consider when buying a TIG welder.
The Duty Cycle:
The duty cycle is often quoted for machines that perform tasks. It is usually shown as a percentage. I.e. A 60% duty cycle means the machine can operate performing physical work (near full power) for 60% of the time.
To try and translate this, a 200A welding set with a 60% duty cycle would be designed to operate at say near full power (170A) for 36 minutes every hour. A 100% duty cycle would indicate that it can operate at near full power for a whole hour, every hour. Even in a production environment, a 100% duty cycle would be rare, as there would be brief moments on standby whilst moving between tasks.
The duty cycle is therefore a good indication of how much the TIG welder (or any other machine) is expected to be used. But it needs to be in the context of ‘time used doing physical work’.
Metal Thickness:
The metal thickness of what you want to weld (and the items ability to act as a heatsink) needs to be taken into consideration, as this will dictate the power that the TIG welder needs to deliver. I.e. Do you need a 140, 200, 300, 400 Amp output?
The TIG welder’s specifications should give an indication of what it can weld.
Portability:
- Do you need to carry the TIG welder around (and the shielding gas bottle).
- Do you have (need) a trolley?
The type of TIG welder (transformer or inverter) and it’s size may have an impact on its ability to be carried around?
Adjustments:
What type of adjustments do you want? How much you want to tweak the settings may have a bearing on the TIG welder you buy and it’s cost (see the section ‘TIG Welding – Enhancements & Controls:‘).
Memory, etc:
Manufacturers sometimes offer memory settings. This is for people who weld lots of different materials, or where a machine is used by more than one person (a bit like a car seat memory for different drivers).
A memory can be useful when welding an item that needs various different settings. E.g. Welding an item that has different sized components, or when welding different materials on a regular basis.
A Foot Pedal:
A foot pedal is often used when TIG welding Aluminium (Aluminium has a lower melting point). This is so you can control the amperage as you weld, allowing you to produce a more consistent and better quality welds.
A foot pedal can be used when welding other materials (with a higher melting point), but the advantages may be diminished.
The Cost…
The cost of a TIG welder can vary greatly. It basically comes down to:
- What can you afford?
- What features do you want?
- How often will you use it.
- Is it for business or personal use (spares backup, time to repair, etc).
- Resale value.
If you’re using a TIG welder for business use, then you would probably want to get it repaired quickly and easily, so you may pay for service availability. However, if you have a cheap and cheerful machine, then you may want just want to junk it and get another?
But, you may also want to consider the greenest option?
- Power usage (an inverter type of welder usually consumes less power).
- How repairable is it..?
Image Gallery:
– click or tap the image to view full size –