How to Fix Strange Electrical Problems in Your Car – Easy Troubleshooting Guide
Is your car doing strange things? Like one brake light goes out when you brake, and the indicator near to it lights up. Do you have an electrical fault that’s difficult to find. This guide will show you how to diagnose and fix weird vehicle electrical issues, especially those caused by intermittent wiring problems, or bad earth connections.
Topics:
- Common Symptoms of Car Electrical Problems:
- Why Electrical Systems Misbehave in Cars:
- Safety Precautions:
- How to Diagnose Car Electrical Faults:
- How to Fix Poor Electrical Connections:
- How to Fix Bad Grounds or Earth Points:
- Hints & Tips:
- Fault Examples:
Common Symptoms of Car Electrical Problems
Not all car electrical issues are caused by failing components. Sometimes, there’s no obvious part to replace. Just strange symptoms that make diagnosis difficult. This article focuses on hard-to-find car electrical faults, especially those caused by poor connections, bad grounds (earths), and intermittent wiring issues.
Topics:
General Electrical Faults in Vehicles
If you’re experiencing odd electrical behavior with no clear cause, you’re not alone. These mysterious faults can present themselves in many ways, such as:
Such as:
- Lights not working correctly?
- Dashboard warning lights showing when no fault can be easily found?
- The Intermittent operation of electrical items (e.g., boot lid opens when you open the driver’s door).
- Power windows or central locking systems suddenly stop working
- Unusual or “weird” electrical behavior.
Common Causes:
These issues are often due to bad electrical connections, such as:
- Corroded, dirty, or tarnished (oxidized) connectors.
- Broken wires or open circuits.
- Moisture or damp ingress in connectors or modules.
- Faulty or non-communicating ECU (Electronic Control Unit).
- Power-saving “timeouts” initiated by the vehicle system.
Electrical Issues When Braking or Indicating
Experiencing issues when using the brakes or turn indicators? This may be a bad earth (ground) problem. Does it only happen when towing a trailer?
Symptoms of a Bad Ground (Earth) While Braking or Indicating:
- lights dimming or flickering.
- Unexpected lights turning on.
- Brake, reverse, or side lights flashing when using indicators.
These faults usually occur when the negative return path (often called the earth or ground connection) is compromised due to:
- Corrosion or tarnishing of the ground connection
- Loose or damaged connections to the vehicle chassis
For more details on how to diagnose and repair this issue, see the section on: How to Fix a Bad Earth Connection in a Car below.
Indicators Flashing too Fast?
This is often a sign of an electrical load imbalance (where the load on the circuit has changed). Commonly a blown bulb. Or the original bulb has been replaced with a different type, such as an LED.
Please see this article: Why do Turn Signal (Indicators) Flash Fast on One Side?
Why Electrical Systems Fail & Misbehave in Cars:
Causes of Strange Electrical Issues
The automotive environment is tough on electrical systems. Components are exposed to:
- Extreme hot or cold temperatures.
- Exposure to water, oil, dirt, dust and road salt.
- Vibration, mechanical abuse and physical shock
These are Common Stress Factors Affecting Automotive Electronics.
Over time, these conditions can lead to corrosion, damaged wiring, or poor electrical connections. Protecting connectors, inspecting grounds, and treating exposed components are key steps in maintaining a healthy electrical system.
Unusual Electrical Faults with No Obvious Cause
If your car exhibits weird electrical behavior, such as malfunctioning lights or unresponsive switches. And no part seems broken, the issue is often one of the following:
- Corroded, dirty, or tarnished (oxidized) connectors.
- Loose electrical connections.
- Broken or damaged wires
- Moisture ingress into connectors or control modules
- Glitches in an ECU or control unit
Modern vehicles often use complex, computer-controlled electrical networks. Circuits no longer run directly from switch to component. They may route through multiple sensors and ECUs. As a result, diagnosing electrical faults can be tricky and it often requires the use of diagnostic tools or OBD2 scanners.
When Lights Behave Strangely: Symptoms of a Bad Earth
One of the most common causes of strange lighting behavior in cars is a bad earth connection (ground fault). On most metal-bodied vehicles, the chassis acts as the return path for electrical current. If this connection is corroded or loose, power may try to return through unintended circuits. Causing odd electrical or lighting issues.
Typical Symptoms of a Bad Ground Connection:
- Indicator lights flashing dimly or erratically.
- Brake lights causing other lights (tail, fog, reverse) to activate.
- Lights going off when switching others on, (such as when braking).
- Bulbs that test good but don’t illuminate.
- Light faults appearing only when a trailer is connected.
In vehicles made of fiberglass or plastic, the ground return must travel through dedicated wires, increasing the chance of failure if those wires are damaged or poorly connected. If current tries to flow through multiple light bulbs, it creates higher resistance, causing lights to dim or behave erratically.
For example, if your indicator is flashing dimly and other lights flicker along with it, or the brake light causes indicators or tail lights to flash. You’re likely dealing with a bad earth issue. This can also happen when towing a trailer that has poor grounding, which interferes with your vehicle’s lighting circuit.

- When indicating… the flashing indicator lamp is dim and other lights (tail lights, fog lights, brake lights, etc) flash as well (sometimes very dimly)?
- When braking, the brake light is dim and other lights (tail lights, fog lights, indicator, etc) come on as well?
- If switching on a light, other lights may go off?
- The bulbs are good, but the light just doesn’t work?
- This fault can sometimes appear when connecting a trailer. The trailer can have a ‘bad earth’ which then affects the lights.
More information on a bad earth can be found below: How to Fix Bad Grounds or Earth Points.
Safety Precautions
If the battery needs to be disconnected during fault finding process, you may need to be aware of the following precautions:
* Caution: If Disconnecting the Battery *
Do not short the battery connections, or yourself between the live supply and the earth (or bodywork). It will give you a shock! 12v is not enough voltage to kill you, (but batteries larger than 12v may be a different story). In very rare cases the battery could explode (via a spark, igniting hydrogen gas given off by the battery) sending acid and battery bits everywhere…
Important Precautions When Disconnecting a Car Battery
Before you disconnect your car battery, it’s essential to understand that doing so can trigger a range of unexpected issues. Modern vehicles rely heavily on electronic systems that may become disrupted when the battery is removed or reconnected improperly.
Common Problems After Disconnecting a Car Battery:
- Radio or Infotainment System Security Code: Some vehicles require a security code to reactivate the radio or entertainment center after the battery is reconnected. Make sure you have this code before disconnecting the battery.
- Fault Codes from Disconnected Components: If you disconnect the battery and then reconnect it while a component is still unplugged (e.g., an infotainment system), your vehicle may generate error codes. For example, certain Skoda models integrate the airbag warning light with the entertainment unit. If the battery is reconnected while the unit is unplugged, it can trigger an airbag fault warning that must be cleared using a diagnostic tool.
- Power Window Reset Issues: Disconnecting the battery while an electric window is open may cause it to lose calibration. Some vehicles require a reset procedure, such as holding the window switch in the up position for 10 seconds, or waiting for the system to auto-reset after a few minutes.
Always consult your vehicle’s owner’s manual for model-specific instructions and reset procedures after battery disconnection. Skipping these steps can result in non-functional systems or persistent dashboard warning lights.
ℹ️ For More Information, follow the link: Disconnecting & Removing a Vehicle Battery.
⚠️ If you are unsure about working on vehicle electrics, seek the advice of an electrical engineer.
How to Diagnose Car Electrical Faults (Fault Finding)
When There is Nothing Obvious?
Learn how to troubleshoot strange electrical issues in modern vehicles when there are no clear signs of failure.
Topics:
- Is the Supply is Missing?
- How to Identify Faulty Connections:
- What to Check When Diagnosing Electrical Faults:
- For diagnosing a Bad Earth, or Ground (see the section How to Fix Bad Grounds or Earth Points below.).
Diagnosing a Missing Electrical Supply
- Trace the circuit back through the vehicle.
- Check various points to see if there is a supply. This often involves checking the source, and then at different points along the route (in case there is a bad, or missing connection).
Note:
Modern vehicles (especially those made after the year 2000) can be equipped with advanced electronic control systems. These systems monitor circuit performance. It is possible that an electronic control unit (ECU) has automatically shut off power to certain components if a fault is detected. If the vehicle has this built-in protection feature, it is designed to prevent damage to sensitive electronics, or to avoid overheating wires, which could lead to fire.
Even if there are no failed components, increased resistance from a corroded or damaged connection could prevent a component from working (or trigger the ECU to cut power). This might also result in a warning light on the dashboard or a stored fault code.
In many cases, you’ll need to inspect the wiring and connections closely. Look for subtle signs like discoloration, heat damage, or even intermittent connectivity that could be affecting the supply voltage. If the ECU has cut power, this would usually be via a relay. Though it could be circuit card based and be difficult to find without diagnostic software.
How to Identify a Bad (Faulty) Electrical Connection
Intermittent faults are often caused by poor electrical connections. For example, on a modern Mini, the left rear indicator repeatedly failed, even though the bulb and wiring were fine. The light would work temporarily after reconnecting it, only to fail again after a few weeks. Eventually, the root cause was identified as tarnished metal contacts within the light housing.
Tarnishing is common on brass, copper, soldered ‘tinned’ electrical connections and galvanised steel. It creates a dull film on the contact surfaces, which increases resistance and disrupts the circuit. Unlike rust, tarnish may not be visibly obvious. You can often clean it using a pencil eraser or a fine non abrasive cleaning pad. After cleaning, a thin layer of silicone grease (dielectric grease) can protect the contacts (avoid over-application, as the grease is non-conductive and can insulate the connection if too thick). Vaseline is also an option (but shouldn’t be used when rubber or plastic parts are present).
In this case, cleaning the tarnished contacts restored normal function of the indicator light and the fault has not returned.
What to Check When Diagnosing Electrical Faults
- Confirm that all bulbs and components are functional
- Use a multimeter to check voltage supply along the circuit
- Look for stored error codes in the ECU (these may require clearing after repair)
- Examine all connectors for corrosion, dirt, tarnishing, or mechanical wear
- Check for intermittent open circuits or weak connector pressure
- Be aware that disturbing or moving wires may temporarily resolve the fault, masking the root cause.
Even minor changes in circuit resistance, (such as replacing a filament type bulb with an LED) can confuse modern vehicle control units and trigger false errors. This is why electrical diagnosis requires attention to detail and patience.
Tip: Temperature changes and vehicle vibrations can cause intermittent faults by subtly flexing broken wires or faulty connectors. Lightly moving or “wiggling” the harness during testing may help reveal hidden issues.
Additional Information on Using Silicone Grease
When applying silicone grease (dielectric grease) to electrical connections, always use a very thin layer, (silicone grease is an insulator). The purpose is to seal electrical contacts from moisture and air, not to insulate it. Wipe away any excess to ensure reliable conductivity.
– Too much grease may prevent a good electrical contact –
Notes:
- Disturbing components may temporarily clear any faults.
- Broken wires can be intermittent due to temperature fluctuations and movement. Carefully wiggling, wriggling, jiggling, or just plain moving the wires about, can sometimes highlight issues?
How to Fix Poor Electrical Connections in a Vehicle
If no components appear to be faulty and you’re still experiencing electrical issues… The problem may lie in poor connections, tarnished contacts, or intermittent grounding. These types of electrical faults can be frustrating and difficult to diagnose, (especially if they seem to come and go).
Before you begin any electrical work, review safety precautions and always disconnect the vehicle battery unless testing requires power.
Topics:
- Understanding Tarnished Electrical Contacts:
- Step by Step – How to Fix a Bad Electrical Connection:
- How to Clean Electrical Connections Safely:
- How to Prevent Future Electrical Issues:
- Additional Tips for Diagnosing Poor Connections:
- Summary:
Understanding Tarnished Electrical Contacts
One of the most common causes of strange electrical issues on vehicles is tarnishing, (or corrosion). Electrical connectors can look clean but still fail to make proper contact due to a thin layer of oxidation.
- Dull or off-color surfaces instead of bright, shiny metal.
- The connection may look clean, but doesn’t conduct electricity well.
- Tarnishing can cause recurrent faults that temporarily disappear but return later.
This type of issue is especially common in older vehicles (tarnishing comes with age), or those exposed to moisture, road salt, and temperature fluctuations.
Step-by-Step: How to Fix a Bad Electrical Connection
Option 1 – Make or Break the Connection (with Power Off)
Make sure the supply to the circuit is off. Carefully disconnect and reconnect any electrical connectors several times. This friction can help break through oxidation on the contact surfaces. Handle all plastic parts with care, as they can become brittle over time.
Once done, power the vehicle back on and see if the issue is resolved. Some fault codes may still need to be cleared using a diagnostic scan tool.
Option 2 – Make or Break the Connection (Power On – Optional)
Only do this if it is safe and necessary…
- Making and breaking with power on could cause damage to some sensitive electronic circuits.
- Any electrical arcing could cause further damage.
- With some circuits, fault codes could be registered that may need to be cleared?
In some cases, faults may only show up when power is flowing. Gently wiggling, or reconnecting connectors can help identify flickering bulbs or intermittent power issues. This method should be used cautiously, as sensitive components can be damaged.
What are you Trying to Achieve?
By making and breaking the connections. You’re essentially attempting to clean the contacts through the act of abrasion. Although not properly cleaning the electrical contacts, this technique can temporarily restore contact, identifying and highlighting where an issue may be.
How to Clean Electrical Connections Safely
- Identify the faulty light fitting, connector, or electrical component.
- With the power off, disconnect the connection in the circuit.
- Clean the terminals and connector pins using non-abrasive tools:
- Use an eraser or a kitchen-style green scourer.
- For tight spaces, such as a recess. Gently scrape with a precision tool like a jeweler’s screwdriver.
- Make sure to clean both male and female sides of the connection and remove any debris.
- If the connector has a seal, (to prevent contaminants entering). Check its condition.
- Keep bulb glass clean when handling, to avoid stress fractures when heated.
How to Prevent Future Electrical Issues:
After cleaning, you may want to apply a protective barrier to prevent oxidation:
- Use a very thin layer of silicone grease, (or a proprietary electrical lubricant) on contact surfaces.
- Wipe away any excess. Too much silicone grease can insulate instead of protect.
- Silicone grease (dielectric grease) is safe for rubber and plastic and helps keep out moisture and dirt.
For further information on silicone grease, see Additional Information on Using Silicone Grease above.
Regular inspection and preventative maintenance can help stop these problems from recurring, especially in vehicles that face harsh driving environments.
Additional Tips for Diagnosing Poor Connections
Check for black spots or pitting on electrical contacts. These can indicate arcing due to poor electrical contact. Look closely, a blackened pinspot can be very small. Carefully remove the carbon deposits with a small tool or precision file.
As an example:
The curved electrical surface of a light bulb, is often in contact with a flat surface. This means there may be a very small surface area that makes electrical contact. The same can also apply where the male ‘finger’ or ‘pin’ contacts are bent or mismatch the female contacts.
Persistent electrical gremlins in vehicles often come down to small, overlooked connection issues. Systematically cleaning, protecting, and inspecting each electrical contact can resolve intermittent faults and improve system reliability.
Keep at it until you find what’s causing the issue… Intermittent faults can be very elusive. You may need to repeat the process a few weeks\months later (if it reappears).
Summary:
- Seek out anywhere where there is a connection in the circuit where a fault is present.
- Disconnect any electrical supply, (check that no items are affected by this, radio codes, settings, etc). See Disconnecting & Removing a Vehicle Battery.
- Take your time and be careful.
- With connectors, make sure no pins are bent or shorted out.
- Do not power up until everything is re-connected. Other wise fault codes may be introduced that will need to be cleared.
- Carefully make and break the electrical connections anywhere there is an electrical connector in the circuit.
- Try and introduce some form of lubricant to aid the process. Silicone grease can be used, (it won’t harm rubber or plastics). Don’t apply too much, (as it’s an insulator). Wipe away any excess with a cloth. The grease will protect the connections from tarnishing, corrosion and oxidation, (and will make connecting and disconnecting easier).
- This is at your own risk as electronics can be sensitive and things can break. Especially plastic, as it can become brittle.
How to Fix Bad Grounds or Earth Points in a Vehicle
“A Bad Earth”
If you’re experiencing strange electrical problems in your car, one common cause is a bad ground connection, often referred to as a “bad earth”. Poor grounding can lead to dim lights, flickering bulbs, or malfunctioning electrical systems.
The Battery Return Path (and Earths or Grounds on a Vehicle)
On a vehicle, electricity flows from the battery to an electrical device. The electricity, then has to flow back to the battery. The electricity returns back to the battery is called the ‘return path’.
For vehicles made of metal, the return path goes from:
- An electrical device to a connection on the metal bodywork.
- The electricity flows via the bodywork back towards the battery.
- One side of the battery is connected to the bodywork via a lead. This completes the circuit back to the battery.
For vehicles made of plastic, or other materials, the return path goes:
- From an electrical device to an earth (sometimes called a ground) connection.
- The earth or ground connection is then be connected to the battery via a single larger wire, (in place of the vehicle bodywork).
- The electricity flows via this larger wire back towards the battery.
- In cases where there are no other electrical devices nearby, the return wire may go directly back to the battery.
Here’s how to identify and fix a grounding issue step by step.
Step-by-Step Guide to Diagnosing a Bad Ground
To fault find, we need to examine all the potential faults to discount them. This is not in any particular order, (especially if you have an idea, where the fault may originate from).
Using a lighting circuit as an example:
1. Examine the Light Bulbs and Their Sockets
- Turn off the lights.
- Inspect the light bulbs and their sockets.
- Look for signs of wear or corrosion.
- Can any of the light bulbs be swapped, to test if the lamp is defective?
Notes:
- Don’t leave the wrong ‘wattage’ light bulb in the wrong socket.
- Make sure ‘dual’ filament light bulbs are inserted the correct way round.
As this can lead to lights with the wrong brightness (one bright and one dim tail light. Brake lights operating with the wrong brightness, etc, etc)


2. Inspect the Connectors.
- Check any connector for corrosion, water ingress, dirt, or damage.
- With the power off, clean the connection carefully.
- Plug it back in, and test the lights.
3a. Check for a Ground Wire Connection to the Bodywork
- Look for an earth wire leading from the light fitting to the vehicle body.
- This wire is usually secured to the bodywork with a screw, nut, or bolt.
- Remove the wires from the connection. Clean the contact surfaces, and reattach.
- Check the lights again.
3b. Is the Earth Wire Connected Direct to the Battery?
- In some setups, the ground wire may return directly to the battery.
- Follow the wire and inspect all connections along the path for signs of corrosion, breaks, or poor contact.
4. Check Trailer Hitch Wiring (If Installed)
If it still doesn’t work… Do you have a tow hitch fitted?
- If your vehicle has a trailer tow bar or hitch, inspect the wiring.
- Trailer wiring often connects via screw connectors that can corrode, or become loose over time.
- Check the trailer male and female sockets for tarnishing, corrosion, dirt and water ingress.
- There could be broken wires from the process of connection & disconnection of the sockets. As the cable and connectors may have been disturbed and moved around multiple times.
Preventing Future Electrical Issues on Vehicles
To minimize the chance of grounding faults in the future, apply these preventive tips:
- Protect electrical connectors using dielectric grease (silicone grease), or a proprietary electrical lubricant.
- Clean hard-to-reach contacts with an approved electrical cleaning spray.
- Be cautious with chemical products, as some oils or greases can damage rubber seals, plastic housings, or wire insulation. Always read the manufacturer’s instructions before application, (In most cases, silicone grease, doesn’t harm rubber or plastic).
- Avoid touching lamps with dirty hands — grease and oils on the bulb’s glass surface can reduce its lifespan and cause uneven heating. This can lead to failure (cracking of the bulb’s glass).
Real-World Examples of Strange Car Electrical Problems
Vehicle electronics can behave unpredictably. Especially when poor, or intermittent electrical connections and moisture ingress can cause unexpected or weird faults. Below are some real-life examples of car electrical faults that were difficult to trace. It also reveals the importance of checking connections and looking beyond the obvious.
Actual Fault Examples:
Faults:
- Handbrake Warning Light Due to a Rear Light Issue:
- Boot Lid (Trunk) Opening Randomly?
- Intermittent Indicator Fault:
Handbrake Warning Light Due to a Rear Light Issue
My wife’s Mini… A fault showed intermittently on the dashboard, as a handbrake warning light (and another warning symbol would occasionally show). The handbrake symbol would vary in colour (red and sometimes orange). Walking around the vehicle, I noticed a rear side light had gone out.
I fixed the rear side light, (a poor connection to the lamp) and the dashboard errors disappeared! But it had been showing a handbrake warning, rather than faulty light warning?
It’s always worth looking around the vehicle for unrelated faults. This shows how unrelated components can trigger misleading fault symptoms, especially when electronic control units (ECUs) are involved. It’s always worth checking to see if there are any other issues, as electronics can do strange things…
———-
An Electronically Operated Boot (Trunk) Lid Opening Randomly?
Another unusual fault involved my wife’s mini again. The boot would occasionally, automatically ‘pop’ open when the driver’s door was opened. What has the boot got to do with the driver’s door..?
The issue was traced back to water ingress in the rear number plate light housing. This housing contained a microswitch, with a rubber button to open the boot (trunk) manually. This micro switch suffered from water ingress, and was also on the same circuit as the door courtesy light… Via a shared ECU (Electronic Control Unit) connection.
When the courtesy light was activated (by the drivers door), it triggered the boot micro switch. The water ingress and shared circuit was causing the boot lid to open.
Open Driver’s Door > Courtesy Light Comes On > Wet Boot Switch > Boot opens…
———-
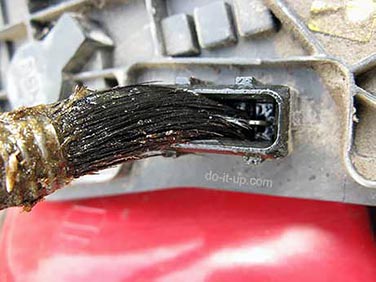
Intermittent Indicator Fault
The Mini again… A persistent issue with a rear left indicator showed a dashboard warning, despite the bulb being fine and power being present. Temporary fixes like removing and reinserting the lamp, or reconnecting the wiring would only work for a few weeks before the fault returned.
Eventually, the root cause was found… Tarnishing on the galvanised steel contact surface inside the light fitting.
Tarnish (oxidation without visible corrosion), can prevent a good electrical contact, or increase the electrical resistance and cause control modules to misinterpret signals. Cleaning the contact with a pencil eraser, or non abrasive cleaner and applying a small amount of silicone grease resolved the issue that had been appearing for some time.
Conclusion
Electrical systems in modern cars can be complex. Even seemingly unrelated issues can be connected through shared ECUs. An increased number of electrical connectors, where poor connections can increase over time with age. Patience and attention to detail are often needed to track down the real cause.
Strange things definitely happen with vehicle electronics!
I hope this helps… ![]()

