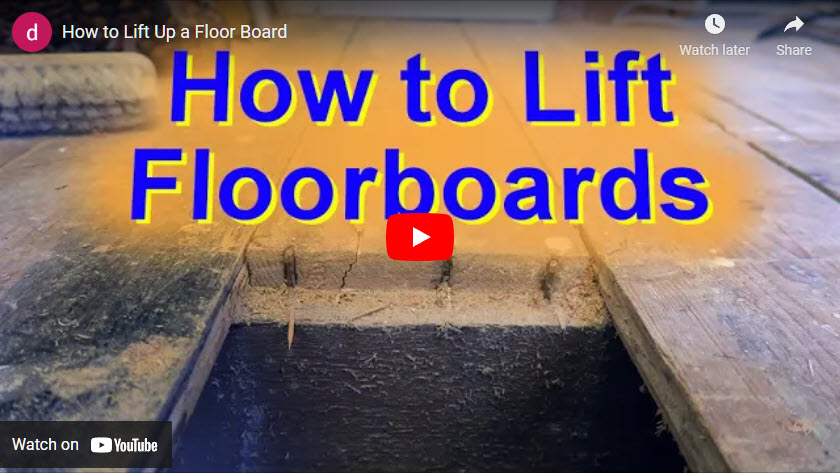
How to Lift up a Floor Board
What is the best way to lift a floor board? What tools should I use, what’s under the floorboard that I can’t see and might damage? Where should I cut it? There are many questions to ask?
When you lift a floorboard, you will also need to work out how you are going to put the floorboard back afterwards? You may need to consider…

Topics:
- Video:
- Which Tools Should I Use?
- Buying Tools:
- How was the floorboard fitted?
- What’s under the floor?
- Do I need to cut the floorboard?
- Where do I cut the floorboard?
- Is the floorboard going to be properly supported when I put it back?
- Lifting the Floor Board.
- Replacing the Floor Board:
In this example…
I’m going to lift a short length of floor board close to a wall, this demonstrates most examples of lifting a floor board.
– Safety –
Cables and pipes are often run under floorboards. Cutting a live cable can kill, so choose your tools and how you plan to use them carefully. If in doubt, stop and seek advice.
How to Lift up a Floor Board… (Opens in a new tab)

Which Tools Should I Use?
When choosing tools to lift floorboards, you need to consider whether they might damage cables or pipes under the floor. For instance, you could use:
Circular Saw:
- A circular saw will cut straight through a pipe or cable.
- However, to prevent this… Place close attention to the depth of the saw blade.
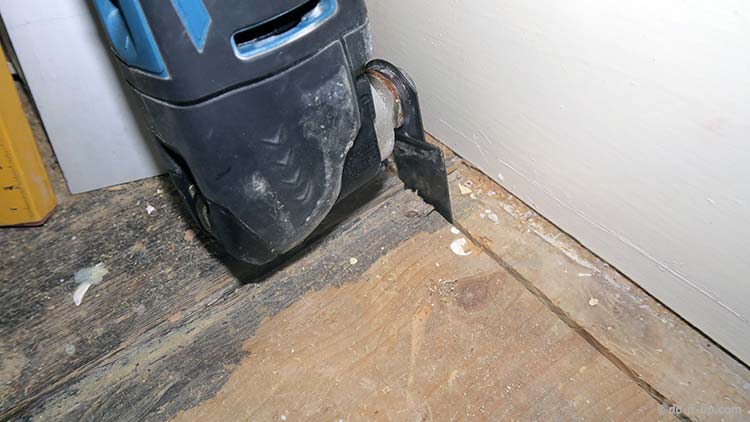
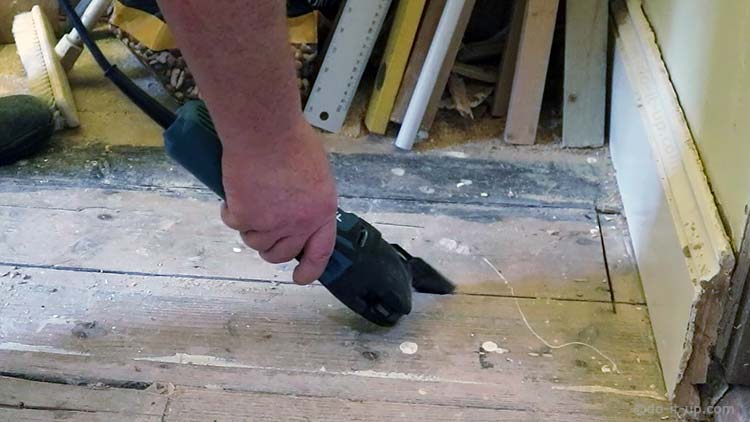
Multi-tool:
- A multi-tool has an oscillating head that tends to cut better when an item is fixed and cannot move (it was originally designed for removing plaster casts). Cables often hang freely under floorboards.
- Therefore this can be a more gentle tool if used carefully, plus it makes a smaller cut.
- However, A multi-tool is still perfectly capable of cutting pipes and cables.
Jigsaw:
- A jigsaw will cut the floorboards where there is open space beneath, (a jigsaw will also cut any pipes and cables that are there).
- The other downside is that it cannot easily cut a floorboard where it meets a floor joist, (don’t cut through the floor joists).
Hand Saw:
- A hand saw is perfectly able to cut through floorboards, but it takes more time and effort.
- Hand tools are much more sensitive to touch and feel and the different noises they can make. So if you’re sensitive to it’s feedback. you can feel when you come into contact with another object.
- However, A hand saw is still perfectly capable of cutting pipes and cables.
Hand Tools:
There are a lot of hand tools than can be of use. It may all depend what you have to hand…
- Pry Bar (Crow Bar, Pinch Bar, Wrecking Bar, Gemmy).
- Large screwdrivers.
- Hammer.
- Rubber Mallet.
- Chisels.
- Torch,
- etc…
Most tools will cut or damage pipes and cables. So, try and take this into account when choosing which tools to use. Often you will need to use a combination of tools. For instance, you could use a jigsaw (if you’re sure there are no cables and pipes underneath) and a chisel or hand saw to cut the floorboard above a floor joist:
- Plan ahead.
- Investigate where cable runs and pipes may be?
- Should you cut an inspection hole?
- Always check the tools depth of cut (whilst unplugged).
- Use caution.
Buying Tools:
The table below gives a few examples on the tools you can purchase, to help getting those floorboards up…
Examples of what you can buy & how much they cost (examples from eBay):
| Tools | ||
|---|---|---|
| Area | Power | Hand |
 |
Circular Saw | Hand Saw |
| Multi-tool | Pry Bar | |
| Jigsaw | General Tools | |
 |
Circular Saw | Hand Saw |
| Multi-tool | Pry Bar | |
| Jigsaw | General Tools | |
 |
Circular Saw | Hand Saw |
| Multi-tool | Pry Bar | |
| Jigsaw | General Tools | |
 |
Circular Saw | Hand Saw |
| Multi-tool | Pry Bar | |
| Jigsaw | General Tools | |

Thank you for your support.
How was the Floorboard Fitted?
The first thing is to work out, is how the floorboard:
- Is fixed?
- Where are the floor joists?
- Do I need to cut the floorboard?
- If so… Where the best place to cut the floorboard?
- Are there any pipes or cables underneath the floorboard?
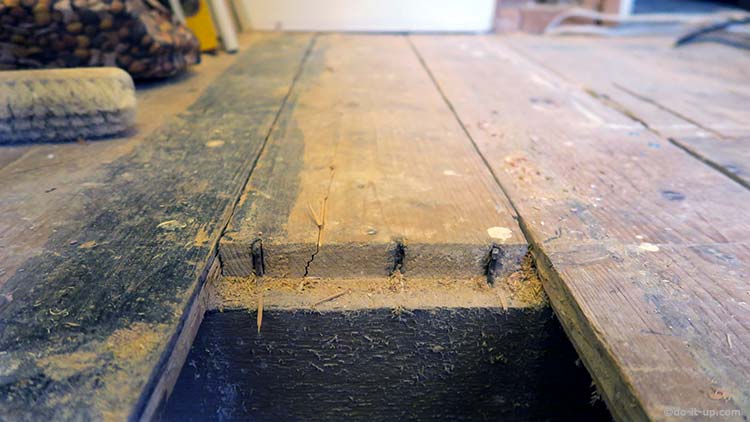
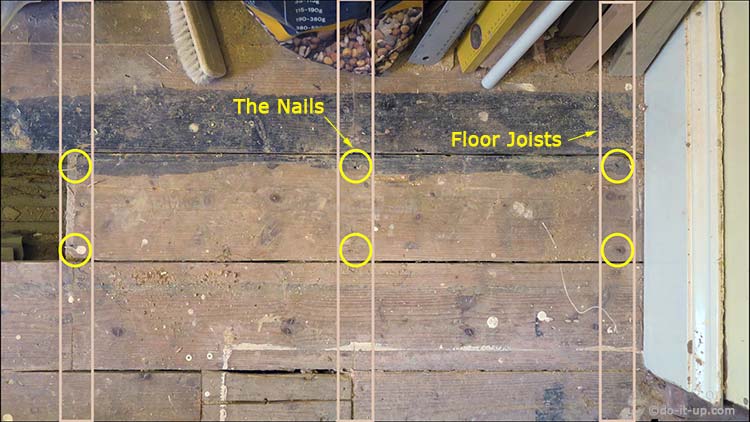
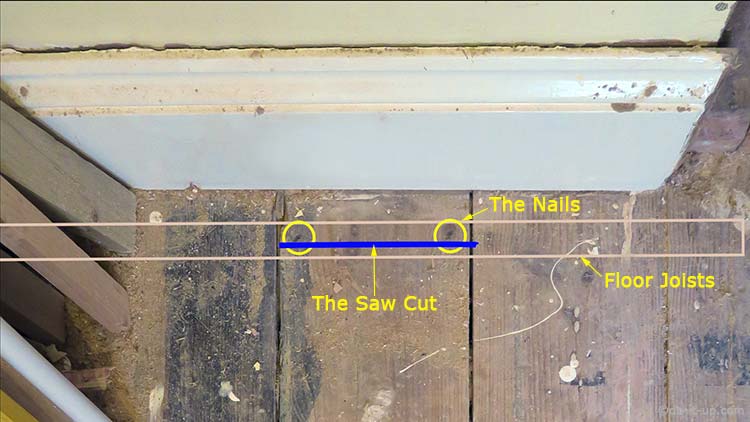
Look for the nails fixing the floor board down. If you are very lucky, the floor board will have been fixed in place with screws. But this will be unlikely, unless the floorboard has been lifted before.
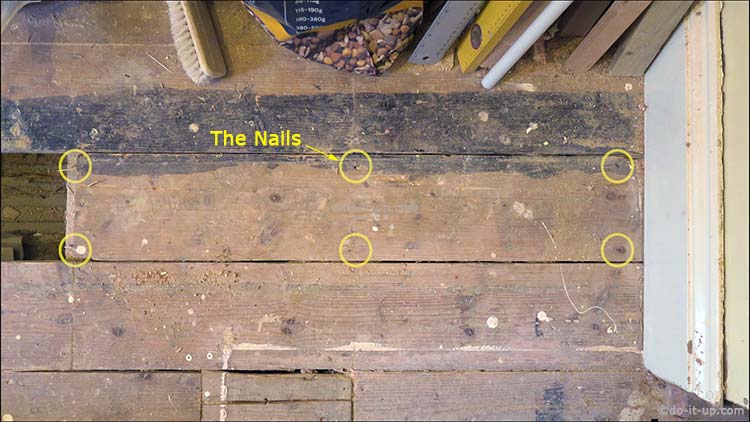
The position of the nails will indicate where the floor joists are. It’s always best to make a perpendicular saw cut above a floor joist, if you can.
The floor joists will therefore be in the following positions…
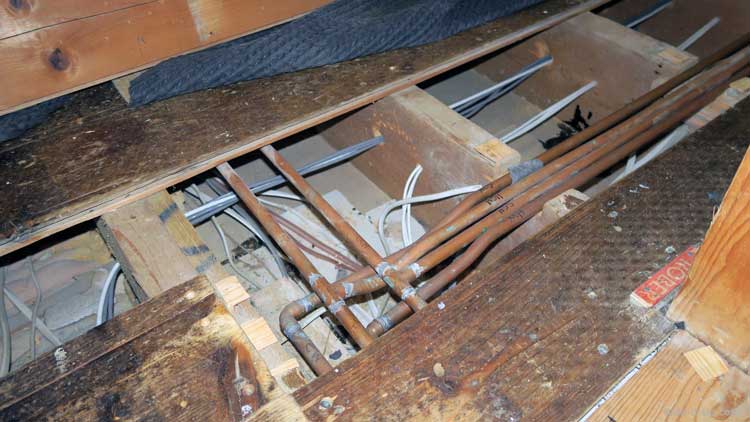
What’s Under the Floor?
We can’t see what’s under the floor. There may be pipes or cables, so we need to try and protect ourselves from accidentally damaging them. Plus there is also a risk of electric shock.
How can we reduce the risk..?
- We need to make sure we miss the pipes and cables, (you can never be completely sure where they are…). Therefore we need to set the depth of the saw blade (see “Setting up the saw…” below).
- Carefully cut an inspection hole to see what’s below?
- Look for any floorboards that have been previously removed. Can they be easily lifted to inspect underneath, (Note: They may have been originally lifted to install pipes and cables)?
- Cut the first floorboard by hand (with the power switched off!). Use this first hole as an inspection hole to check what’s underneath.
- Expect the unexpected?
Do I Need to Cut the Floorboard?
Ask yourself the following questions:
- Where do I need to lift the floorboard?
- Is there any existing joins or cuts in the floorboard I can use. Sometimes there can be an existing join a little further on?
- Have any floorboards been screwed down, making them easier to lift?
If there are existing joins or cuts in the area of the floorboards you want to lift, it may make things easier and save you from cutting the floorboard.
Where do I Cut the Floorboard?
Where possible, always cut the floorboard, as close to the centre of a floor joist as you can. If there are nails in the way, we want to just miss them, so we don’t blunt the saw blade…
If needed, mark where the cut is to be made with a pencil.
Setting up the Saw…
– For Safety –
When adjusting tools, unplug them from the mains electricity.
- If you can, use a floor board to set the saws maximum cutting depth.
- Or if you are unsure of the cutting depth. Start with a shallow cut, slowly increasing the depth with progressive cuts.
Cutting the Floor Board…
If you’re not sure of the floorboard depth, do more than one cut. Start with a shallow cut increasing the depth a little at a time.
– Safety Tip –
Don’t need access yet..? Should lifted floorboards be replaced (until access is needed in the area)?
Finishing the Saw Cut…
A circular saw makes a circular cut. Therefore, to fully cut the floor board all the way across, you have to make a longer cut.
Or… You can finish the cut off with a chisel or a multi tool for a neater cut.
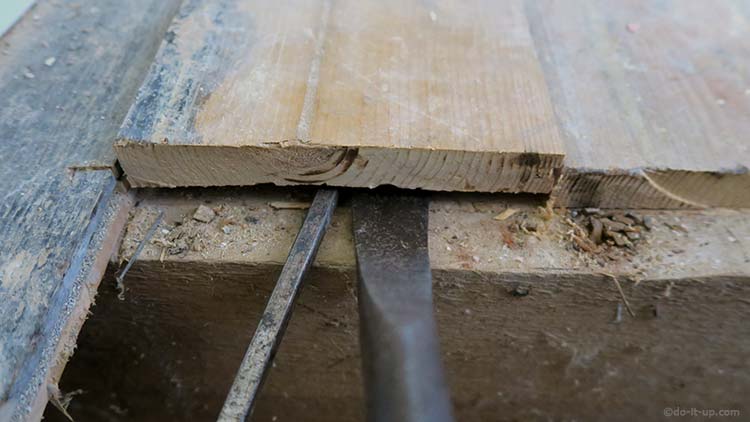
The tongue & groove joint…
Most floor boards are made with a ‘tongue & groove’ join. This can stop you lifting the floor board.
Therefore, the tongue & groove joint has to be cut. You can also use a multi-tool, circular saw, hand saw or jigsaw to cut the tongue and groove…
But don’t cut through any pipes or cables underneath the floor?
Note:
Adjacent floor boards can be lifted without cutting the tongue & groove… Once the first floor board is lifted.
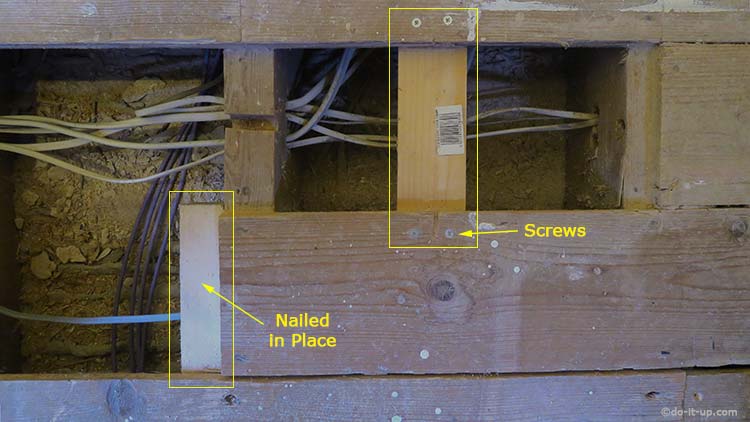
Is the Floorboard Going to be Properly Supported When I Put it Back?
What happens if you can’t cut the floor board directly above a floor joist?
Cut the floorboard as normal, but be prepared to add additional support underneath the floorboard, (to support the floorboard where it was cut on replacement).
Two examples…
- Add a wooden support, nailed or screwed to the side of the floor joist.
- Or, add a piece of wood screwed to the underside of adjacent floorboards.
Lifting the Floor Board:
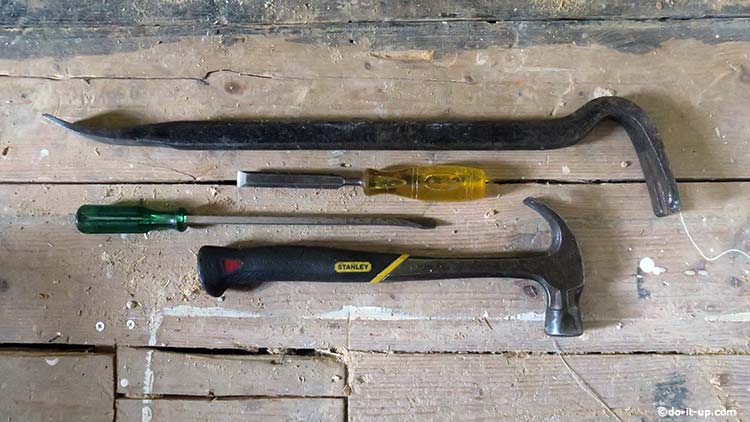
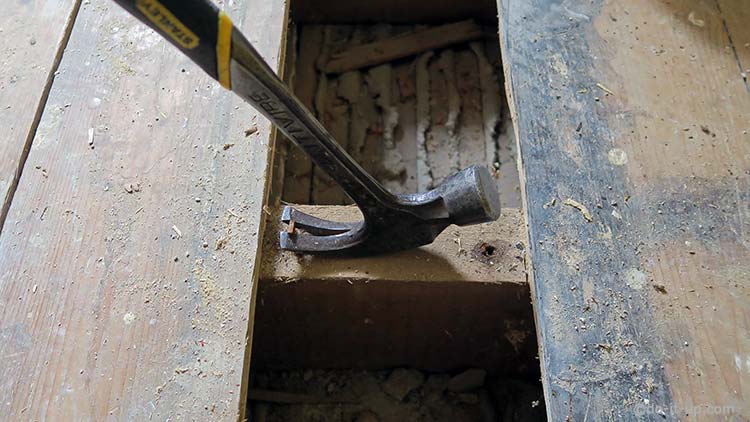
The best tool for prising up the floor board is a crowbar (or wrecking bar). A large screwdriver or chisel can be used to make a gap for inserting the crowbar.
Be careful though, as the wood can split as it lifts…
If you are lifting lots of floorboards of a similar size, number them on the underside, so you know which order they go and where they go back.
Removing Nails…
For safety reasons, always remove nails from the floor board, (or those left behind in the floor joist).
It’s very easy to step on, or trip over a nail sticking out…
Best tools for the job, claw hammer, or crowbar (also known as a wrecking bar or jemmy).
Replacing the Floor Board:
This should be straight forward if the floorboards are undamaged and they are refitted in the same position (number the floorboards as you lift them). You may need to add additional support, if the perpendicular cut wasn’t above a floor joist (see “Is the Floorboard Going to be Properly Supported When I Put it Back?“).
I would advise against using nails to replace a floorboard. You never know when you might want to lift the floorboard again? Nailing floorboards back down using similar sized nails in the original holes could also lead to creaking floorboards and movement.
Screws on the other hand, let you know if they’re not fully tightened. If the screw is loose, you can use a longer or bigger screw. And most importantly… You can easily lift the floorboard again later on if you need to.
