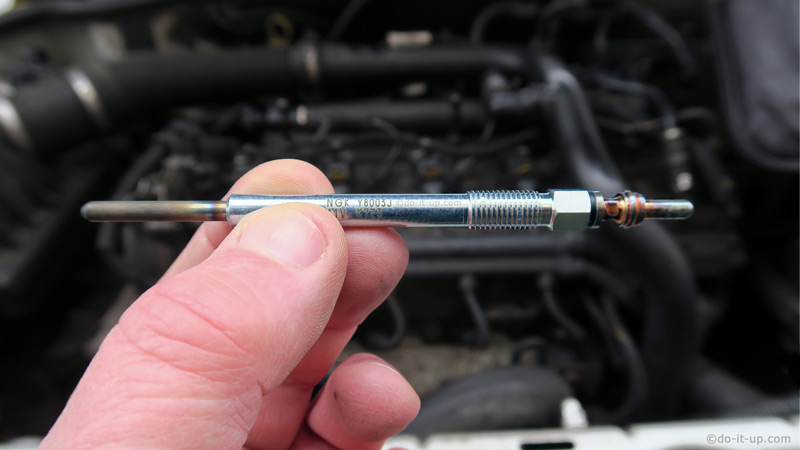
My Diesel Won’t Start When its Cold – How to Fix Glow Plugs.
Diesel engines start using the compression of the air fuel mixture. Diesels don’t like starting when cold. Hence diesel engines are fitted with glow plugs to heat the air fuel mix, to assist starting when cold. Whereas petrol engines start with the assistance of a spark plug to ignite the fuel.
If a diesel engine is running well and starts easily when the engine is warm, but won’t start when cold, (or takes ages to get it started when cold). It could be an issue with the glow plugs, the glow plug system (module, relay, or voltage supply).
Video: It Won’t Start When the Engine is Cold. Is it the Glow Plugs?
Topics:
- Diesel Cold Starting – Fault Symptoms:
- Diesel Cold Starting – The Causes:
- How do Glow Plugs Work?
- Fault Finding?
- Checking the Glow Plugs:
- Ordering Parts:
- Replacing Glow Plugs:
- Dashboard Indication:
- Image Gallery:
List of checks that can be carried out:
With a Multimeter:
- The Supply Voltage:
- The Timer (Control Module):
- The Resistance (and Continuity):
- Typical Resistance Values:
- Glow Plug Resistance Explained:
- Failing Under Load:
Without a Multimeter:
This page contains all the detail on glow plug fault finding, their fault symptoms, testing and repair.. If you just want to view the videos, they can be found on this page ‘Diesel Won’t Start When Cold – The Video’s‘. (Opens in a new tab)).
This article is for guidance only…
Diesel Cold Starting – Fault Symptoms
- The engine turns over at a reasonable speed (it’s not slow cranking), but the engine won’t start?
- The engine starts, but only after some time (and multiple attempts)?
- White smoke is seen from the exhaust (unburnt fuel).
- When the engine is warm, it starts easily.
You may see white smoke from the exhaust whilst trying to start the engine and for a short while when the engine starts (unburnt fuel). The video above shows an example of what can happen:

Diesel Cold Starting – The Causes
If you see white smoke coming from the exhaust (unburnt fuel), after several starting attempts…
- Some, or all of the glow plugs may have failed?
- There maybe no voltage supplied?
- The glow plugs may be switching off too soon, or not switching on at all? The timer (or control module) could be defective?
Why Glow Plugs Fail:
There could be a number of causes why they’ve failed. Often, the cause may be just down to failure due to old age and wear and tear! A glow plug is stressed throughout it’s life. It can go from frozen to glowing red hot in a matter of seconds. There is expansion and contraction, oil, rust, corrosive gases, pressure, combustion (explosions), etc, etc. Glow plugs have a hard life! The materials used and quality of manufacture probably have a lot to do with their lifespan, plus… Where you live (the engines starting temperature), number of times the engine is started, how long the engine is run for…
Philosophical statement here – Glow plugs may be like human beings. Some have a long and happy life whilst others…
There can also be other factors too. As an example, my daughter decided to drive through a deep puddle where water was sucked into the engine. She naturally tried to start the car, but it wouldn’t start (hydraulic water lock in the cylinders). When we cleared the cylinders and got the car started. All the glow plugs started to fail. I presume it was because the glow plugs had been trying to heat the water in the cylinders. An environment glow plugs weren’t designed for? So, there could be a number of causes why glow plugs fail…
How do Glow Plugs Work?
Why do we have have them?
Diesel fuel is not as volatile as petrol. It doesn’t ignite so easily, especially when the air temperature (engine starting temperature) is cold. Diesel engines ignite the air/fuel mixture injected into the engine cylinders, by using the compression created by the pistons. Unlike petrol engines, diesel engines don’t have spark plugs. Diesel engines also needs a bit of warmth to help the process…
As part of an explanation, a few years back, I took part in a demonstration to show if diesel fuel would ignite easily (when there was a diesel spill on water). This was in controlled conditions where diesel was added to a water filled tray. The diesel floated on top of the water. A torch flame was used to try and ignite the diesel. However hard we tried, the diesel would not ignite. However, when we heated the diesel in one corner of the tray, and it began to give off a vapour. We were able to ignite this diesel vapour easily. The heat from the flames in the corner of the tray, then started to heat the rest of the diesel floating on top of the water. This created more vapour, and we soon had a raging fire on our hands (with the whole tray alight). We then had fun putting out the test fire with foam fire extinguishers!
Hopefully this explanation shows how glow plugs can help igniting the diesel when the engine is cold to aid starting (more so in colder temperatures).
Glow Plug Fault Finding?
Diesel Cold Starting – Things to Check
- The relay:
- The timer (or control module):
- The glow plugs:
Note:
- The relay is sometimes a separate item, but it can also be incorporated inside the control module?
- Glow plugs come on in hot and cold weather, to aid starting and help whilst the engine warms up. However, they may be on for different lengths of time.
What Should I Check First (three easy steps)?
For the initial testing, you will need a voltmeter, or a simple method of checking for a voltage. However, it’s not essential. If you don’t have a voltmeter, just go straight to the section on Testing Without a Voltmeter (Multimeter)…
* If you are unsure about working on vehicle electrics, seek the advice of an electrical engineer *
Three Easy Steps:
1. Is there a voltage at the glow plugs?
If there is a voltage supply (the correct voltage), then we know the relay and control module are probably working (also see 2. below).
2. How long is the voltage applied?
There is a timer that applies a voltage for a set amount of time. Therefore you need to check how long the supply is switched on.
3. Check the glow plugs?
If the correct voltage is applied (and for the correct amount of time), then the actual glow plugs will need to be checked.
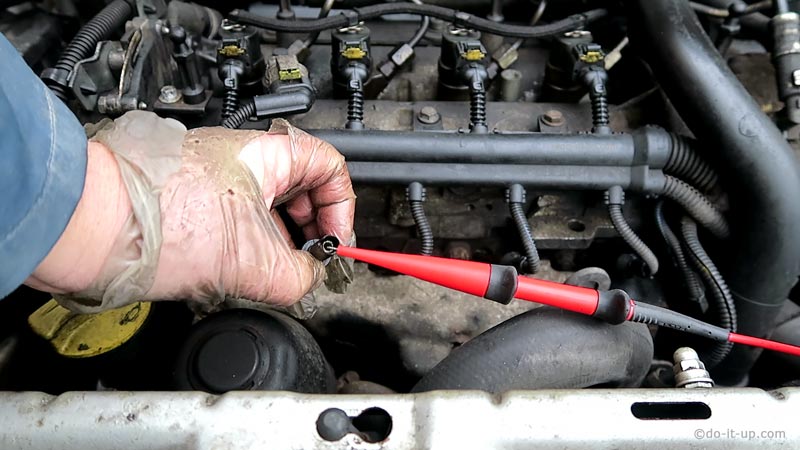
Checking the Glow Plugs With or Without a Multimeter (Test Meter):
It’s easy to check the timer and relay with a voltmeter. If you don’t have a voltmeter, you can still check them with a car battery and a jump lead (see the two options below).
Short video on how to remove glow plugs:
With a Multimeter (Voltmeter):
There isn’t much you can check on the relay and glow plug control module, other than voltages. Therefore, all you need is a simple test meter, (multimeter, voltage meter, voltage tester, or you could use a vehicle lightbulb and some wire). If you happen to have replacements, you can always swap the units over to check their operation?
Please refer to the vehicle manual, as each vehicle may be slightly different.
Topics:
- Checking the Supply Voltage (the Relay):
- Checking the Timer (Control Module):
- Checking the Actual (Resistance):
- Failing Under Load:
Notes:
- To turn on the ignition (without starting the engine).
- The ignition may need to be turned on and off when testing each glow plug, as the timer will operate (the supply may be switched off after approx 10 to 20 seconds depending on the vehicle).
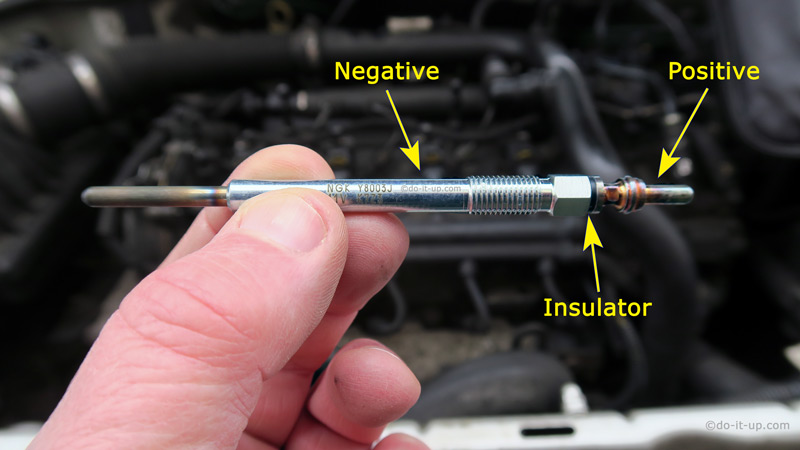
- The black lead, negative (-ve) goes to ground. This can be anywhere:
- Where there is a bare metal surface (that’s earthed).
- An earth point.
- Or, the negative (-ve) battery terminal. (This assumes it’s a negative earth vehicle… There are a few positive earth vehicles out there).
- The supply to the glow plugs will pass through the electrical connection, down through the glow plug and return to the battery via the engine and it’s earth lead.
- To save time, tasks 1 & 2 (the topics listed above) can be done together…
It’s always best to check the glow plug specifications on the manufacturer’s website, especially if it’s a newer type of vehicle!
1. Checking the Supply Voltage (and the relay):
Remove (unclip) each of the connectors and check the voltage to each of the glow plugs when the ignition is switched on. See the video below (at the end of section 2). ‘Testing the Supply Voltage & Timer‘.
What Voltage Should my Glow Plugs Work On?
There is a large number of different voltage specifications for vehicles, ranging from 4.4v all the way up to 23v. The majority appear to be rated at 11v. However, it should be noted that the 11v glow plug will work perfectly fine on 12v, which is the case in the videos shown here. I guess they are rated at 11v, in case the output from the vehicle’s electrical system is low. Plus they will have a + or – operating tolerance.
You could assume that:
- 5v glow plugs will operate on a 6v system. Or, a12v system (where the voltage is regulated down to 5v by the vehicles control unit).
- 11v glow plugs will operate on a 12v system.
- 23v glow plugs will operate on a 24v system.
You may find a manufacturer’s colour coding system, to indicate the operating voltage (i.e. yellow or orange for 5v). However, I would only use a colour indicator as a guide (past experience, where manufacturer’s don’t strictly adhere to helpful indicators).
Always check your part numbers on the manufacturers website to ensure the correct part is being fitted. I.e. If your vehicle system is 12 volts and you find 5 volts is supplied (and you don’t have a manual showing this type of detail). Check the specifications on the manufacturers website, to check the voltage is correct. The voltage may be regulated down (by the vehicles control unit) to a different voltage…
Example:
One manufacture has a range of glow plugs that run at either:
- 11v, 5v or 7v, (dependant on the vehicle and glow plug fitted).
Notes:
- The next generation of glow plugs may have a different supply voltage to that of the battery. The voltage may be pulsed and have a variable timer (the duration of supply controlled by the vehicles control unit and the requirements of the engine). You may need to refer to the manufacturers specifications, to get the correct values. Typical values (next gen) may be between 4.4v to 7v.
2. Checking the Glow Plug Timer (Control Module):
Check how long the timer (control module) voltage is supplied to each of the glow plugs. It should be for around 10 to 20 seconds dependant on the vehicle.
Other things to check:
- If fitted, check that there are no blown fuses in the circuit.
- Sometimes vehicles are fitted with more than one identical relay (fitted for other tasks). If so, you could use the identical relay to test the circuit. Make sure it’s an identical relay, otherwise there is risk of damage (there should be a part number printed on the relay, so you can check).
- The relay is sometimes included inside the control module?
Short video on testing the supply voltage and glow plug timer:
3. Checking the Glow Plug Resistance:
With a voltmeter (multimeter), we can check the resistance. This will tell us if they are:
- Working (low resistance).
- Not working very well (elevated resistance).
- Or have failed (high resistance).
Glow Plugs can be tested either when fitted, or removed. However, a less accurate reading may be obtained if testing whilst still fitted (there maybe additional resistance in the circuit).
Resistance Topics:
- 3.1 Checking Your Test Meter (Multimeter):
- 3.2 Testing the Resistance Installed:
- 3.3 Testing the Resistance removed:
- 3.4 Typical Resistance Values:
- 3.5 The Glow Plug Resistance Explained:
At the end of section 3. is a table of ‘Typical Resistance Values‘, and whether they pass or fail.
3.1 Checking Your Test Meter (Multimeter):
Before you start, you may need to check your test meters resistance?
Select ohms, and connect the multimeters leads together. Is the meter reading 0 ohms? If not, recalibrate your test meter. If there is no facility to do this, just subtract the reading you obtained (when connecting the leads together) from the actual reading taken from the glow plugs.
For example, if you get…
- A glow plug reading of 14 ohms.
- And your multimeter had a reading of 8 ohms (when connecting the leads together).
We now know the glow plug measured 6 ohms – (14 ohms – 8 ohms = 6 ohms).
Notes:
- Make sure the contact points (where you measure the glow plugs) are clean and free from oil and corrosion.
- If the test meters battery is wearing out (running low), the meter may appear to be working. But it could give an incorrect readings as a result. If you suspect this, check your multimeters battery.
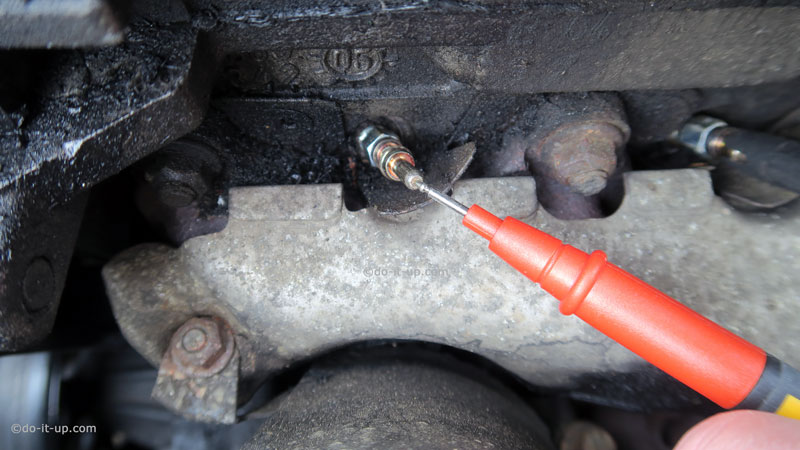
3.2 Testing the Resistance (Fitted):
We can measure the resistance whilst they’re still installed. This may only give an indication of their condition, as there may be additional resistance in the circuit. However, it can prove that there is a circuit and that corrosion is not a factor in the glow plug failing to work.
Short video on how to measure the glow plug resistance (when fitted):
3.3 Testing the Resistance (Removed):
What can we check..?
- The Condition?
- The Resistance?
- The Continuity (a simple open/closed circuit test)?
The Condition?
Carry out a visual check for general condition, such as corrosion, or any obvious damage etc.
The Resistance?
The resistance check is a more detailed check on the condition of the heater element. It can indicate if the glow plug is worn, or on the way out (see the table of Typical Resistance Values below).
Short video on how to measure the glow plug resistance (when removed):
The Continuity?
How to Perform a Glow Plug Continuity Test:
If your test meter can’t read low resistance (1 to 6 ohms), or you don’t have a multimeter? Do a continuity check.
A continuity check will test if there is an open circuit (check if the glow plug is broken internally). You can check continuity with a cheap & simple ‘buzzer’ or ‘light probe’ tester. If you don’t get a ‘buzz’, or a glow from the light, (the glow plug is open circuit) and is defective!
It’s very easy to check, even if you don’t have a test meter (multimeter). To get the best results, remove the glow plug before testing.
Short video on how to test the continuity of glow plugs:
How to Test From Start to Finish (With a Multimeter) – The Complete Guide
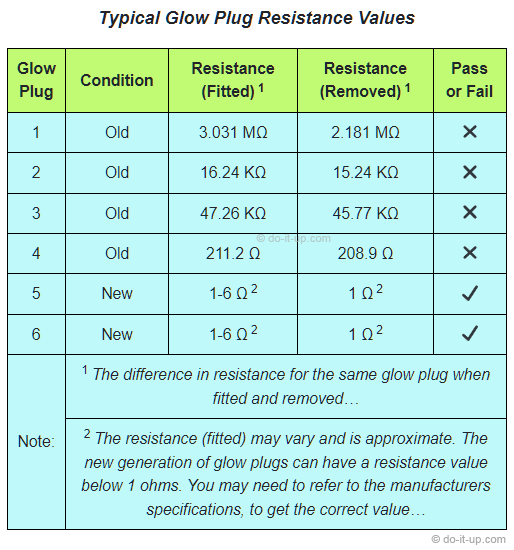
3.4 Typical Resistance Values:
How Much Resistance Should a Glow Plug Have?
The table below shows typical resistance values and whether they would pass or fail. Note the difference in values between measurements taken when installed and removed. This could vary greatly if there is any corrosion present, or there is a ‘bad contact’ when they’re inserted.
Typical Glow Plug Resistance Values
| Glow Plug | Condition | Resistance (Fitted) 1 | Resistance (Removed) 1 | Pass or Fail |
|---|---|---|---|---|
| 1 | Old | 3.031 MΩ | 2.181 MΩ | ✖ |
| 2 | Old | 16.24 KΩ | 15.24 KΩ | ✖ |
| 3 | Old | 47.26 KΩ | 45.77 KΩ | ✖ |
| 4 | Old | 211.2 Ω | 208.9 Ω | ✖ |
| 5 | New | 1-6 Ω 2 | 1 Ω 2 | ✔ |
| 6 | New | 1-6 Ω 2 | 1 Ω 2 | ✔ |
| Note: | 1 The difference in resistance for the same glow plug when fitted and removed… | |||
| 2 The resistance (fitted) may vary and is approximate. The new generation of glow plugs can have a resistance value below 1 ohms. You may need to refer to the manufacturers specifications, to get the correct value… | ||||
Example:
One manufacturer states:
- Resistance ∞ Ω = malfunction: defective glow plug.
- Resistance < 0.2 Ω = malfunction: defective glow plug.
- Resistance > 0.2 Ω and < 5 Ω = glow plug OK.
Notes:
- A typical resistance value for a working glow plug is usually between 1 and 6 ohms.
- The new generation of ‘ceramic’ glow plugs can have a resistance value below 1 ohms. If there is any doubt, you may need to refer to the manufacturers specifications, to get the correct value…
3.5 The Glow Plug Resistance Explained:
Low resistance is good. It means the glow plug will heat up…
“The total energy dissipated by the circuit is proportional to current, so the resistance of the heating element has to be low enough to draw sufficient current to generate enough heat”.
But…
“The resistance of the heating element has to be high enough so that most of the energy is dissipated by the heating element”.
In other words…
You want a low resistance, so the energy is dissipated in the glow plug and it heats up. But… Not a really, really low resistance (like a dead short). Otherwise, the energy will be dissipated in the glow plug, and in the rest of the circuit. Blowing the fuse and potentially melting the wires (dependant on the fuse rating and how quickly the fuse reacts!).
Note:
- Each manufacturer, or circuit design may have slightly differing resistance readings, due to their design parameters (and the actual condition of the circuit will also have an effect).
4. Glow Plugs Failing Under Load:
Glow plugs can fail under load. To check this, you need to measure the current supplied to the glow plugs and see if the current supply falls away over time. You can do this with a test meter, or a clamp meter. Be careful though! You will need to be confident measuring current with a test meter, as you can break your test meter if you configure the connections incorrectly…
Testing Glow Plugs Without a Voltmeter (Multimeter):
There are some easy checks you can carry out, using a:
- Vehicle battery, or suitable earth (-ve).
- A jump lead.
- A piece of insulated wire.
- A 12v light bulb and some wire.
Beware:
- There is a chance that heating glow plugs using a car battery could cause damage, especially if carried out repeatedly, or if heated for a long period of time.
- Some glow plugs have a different voltage rating to that of the car battery. You should be able to check the voltage of your glow plugs on the manufacturers website.
The following tests can be carried out:
You can test when fitted or removed, as indicated below:
Safety Precautions:
- Do not short the battery connections, (or yourself across the battery, it could give you a shock!). 12 volts is not usually enough to kill you, but batteries larger than 12v may do?
- Lead acid batteries produce Hydrogen gas. If enough gas is produced, the battery can ignite from a spark, causing an explosion. One of the products of a battery explosion is acid burns…
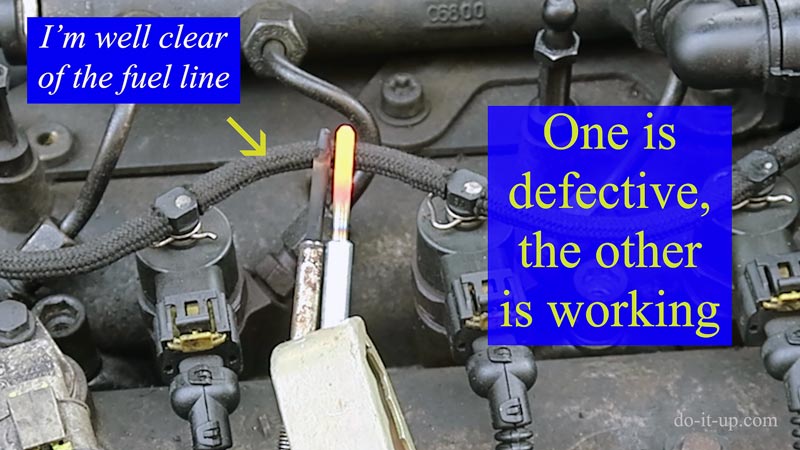
1. Is there a Circuit (When Fitted)?
The glow plugs can be tested for a working circuit (when fitted), by using a wire from a live 12v (or 24v depending on the system) supply and touching the end of the exposed glow plug (with the connector removed). If a spark is present when the end of the glow plug is touched, we know current is passing through the glow plug back to the battery. This indicates the glow plug is not open circuit.
You can also use two pieces of wire and a vehicle light bulb, (you would need to attach the wire to the light bulb connections, or use a bulb holder). One of the wires goes to the positive side of the battery, and the other wire is connected to the end of the glow plug. If there is a circuit, the bulb will light. As an alternative, you can often buy a similar ready made car voltage tester that lights up off the shelf.
Notes:
- Do not use a jump lead for this test! A jump lead is usually too big (and you can’t easily see what you’re doing).
- You are less likely to make the wrong connection with a piece of wire, (i.e. Shorting in the wrong place).
- Shorting can cause wire to melt (with the potential for a fire!).
2. Does the Glow Plug Work (Testing When Removed)?
When removed, we can carry out a visual check whilst testing to see if it works.
For safety reasons:
In this case, use a jump lead for testing, not a thin piece of wire…
- The jump lead will hold the glow plug.
- The jump lead has an insulated handle…
Note:
- Shorting can cause wire to melt and it could cause a fire!
- For negative earth vehicles, always connect the negative jump lead first (or vice versa).
Two Methods:
a. Connect directly to the battery: (not recommended)!
b. Connect to the actual glow plug supply:
a. Connect directly to the battery:
Testing the glow plugs by connecting directly to the battery is not recommended…
For the following reasons:
- Batteries can give off hydrogen gas.
- The glow plug can provide a heat source for the hydrogen, causing an explosion.
- The glow plug voltage and the battery voltage may be different?
- There is a chance that heating glow plugs using a car battery could cause damage, especially if carried out repeatedly, or if heated for a long period of time.
Use method ‘b.’ instead:
b. Connect to the actual glow plug supply:
To save time, two test’s can be carried out the same time. Goto 3. Does the Relay and Timer Work? below for more detail.
- With the glow plug removed, connect to one of the electrical connectors.
- Connect a jump lead to the negative (-ve) of the battery and the other end of the jump lead to the negative (-ve) end of the glow plug.
- Make sure the glow plug is not near anything that could be affected by heat.
- Switch on the ignition. If you have a working glow plug, the heater element will start to glow (see the image below).
3. Does the Relay and Timer Work (Testing when Removed)?
This test is similar to ‘Connect to the actual glow plug supply‘ above, but has an additional test. You can time how long the glow plug works for, (before the timer switches the supply off).
- With the glow plug removed, connect to one of the electrical connectors.
- Connect a jump lead to the negative (-ve) of the battery and the other end of the jump lead to the negative (-ve) end of the glow plug.
- Make sure the glow plug is not near anything that could be affected by heat.
- Prepare to time how long it glows for?
- Switch on the ignition.
- Watch to see if it starts to glow, whilst also timing the duration.
- How long did it glow for? It should be for around 10 to 20 seconds dependant on the vehicle.
- If it doesn’t glow, it’s probably defective (check the connections?).
Short video on how to test without a test meter:
How to Test From Start to Finish (With Jump Leads & Wire) – The Complete Guide
Ordering Parts (Glow Plugs, Test Meter, Tools, etc):
The following table gives examples of the test equipment, tools, etc you can buy to fix your vehicle. If you’re not sure what you need, sometime it’s worth having a look? The list below may give you an idea of what’s what’s available, what to look for and how much it costs…
Ordering Parts – Examples of What You Can Buy:
| Glow Plug Prices | |
|---|---|
| Item | Location |
 UK
UK
|
Glow Plugs |
| Test Equipment | |
| Glow Plug Tools | |
| Jumper Cables | |
 USA
USA
|
Glow Plugs |
| Test Equipment | |
| Glow Plug Tools | |
| Jumper Cables | |
 AUS
AUS
|
Glow Plugs |
| Test Equipment | |
| Glow Plug Tools | |
| Jumper Cables | |
 CAN
CAN
|
Glow Plugs |
| Test Equipment | |
| Glow Plug Tools | |
| Jumper Cables | |
 IRL
IRL
|
Glow Plugs |
| Test Equipment | |
| Glow Plug Tools | |
| Jumper Cables | |
Thank you for your support.
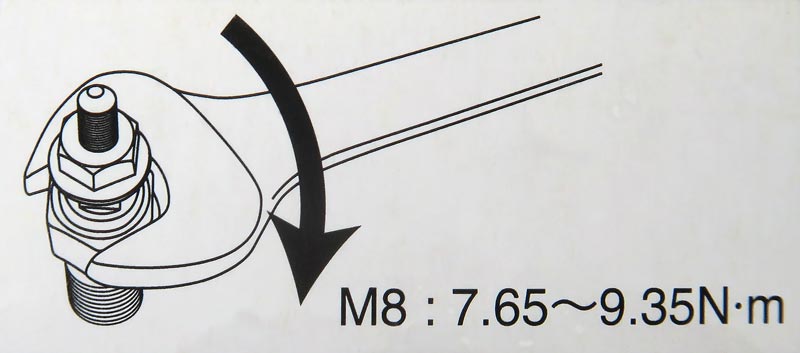
Replacing Glow Plugs:
Is the same as for the removal, except…
- It’s in reverse!
- It may be a good idea to lubricate the threads to prevent corrosion (use some high temperature copper grease, or something similar).
- Don’t overtighten. See the workshop manual for the correct torque. It may be printed on a replacement suppliers box (see the image below).
- Check all the electrical connectors are properly connected and not just resting on top of the glow plugs (it’s easily done!).
Glow Plug Dashboard Indication:
I have seen vehicles where the warning indicator on the dashboard only appears very briefly. So briefly, you can miss it. Whereas on other vehicles, the indicator stays on a lot longer? As a guess, it’s probably down to the circuit design for that particular vehicle (if the vehicle starts and runs fine, with no white smoke). The periodicity the symbol displays may vary from vehicle to vehicle… However, always assume the glow plugs are needed, and wait for them to heat the cylinders, to aid the engine starting process (see the notes below for more info…).
If you need to check they are actually working:
With a test meter:
- Check the resistance.
- See how long the voltage is applied for (example video… How to Test With a Test Meter:).
Without a test meter:
- Operate them when removed from the vehicle (example video… How to Test Without a Test Meter:) and measure how long they glow for.
Notes:
- Operating them when removed from the vehicle? Best to test the glow plugs one at a time, save melting anything nearby!
- Glow plugs come on in hot and cold weather, to aid starting and help whilst the engine warms up. However, the length of time they’re on may vary (if this is built into the vehicles electronics by design).
Image Gallery:
– click or tap the image to view full size –