How to Repair Your Speaker – Replace the Foam Surround (Refoaming).
Speakers can deteriorate with age. The flexible foam surround that allows the speaker to oscillate (and generate sound) can start to disintegrate. This article shows you how to repair and replace the foam surround.
- Has your speaker(s) sound quality deteriorated?
- When you use the speakers, does the sound just rattle around, sound muffled, or just doesn’t sound quite right?
- Has your speaker ‘blown’.
Video – How to Replace the Speaker Foam Surround:

Take a look at the speaker’s foam surround. It could be that your speaker foam has deteriorated and started to fail. It may need replacing?
The speaker foam or rubber surround holding the cone to the speaker frame can deteriorate with age and become perished. If this happens, the speaker or speakers will not work in the way they were originally designed. If you have another speaker of the same age and cone type, this is also probably about to fail. Both will probably need to be re-foamed. The speaker’s life can be prolonged, it saves you buying a new pair, plus you’re doing your bit to save the speaker from a landfill death.
Topics:
How to Repair Your Speaker Surround:
Speaker foam replacement is quite easy but must be done properly – if you want the speakers sound quality to be maintained.

- What do I Have to do?
- How to Check Your Speaker Foam Surround?
- Preparing for the Repair.
- Removing the old foam or rubber surround.
What do I Have to do?
The list of steps below gives you an idea on what’s needed to replace the speaker foam (re-foaming):
- Measure the size of the speaker and the foam or rubber surround.
- Order the new foam or rubber surrounds
- Remove the defective speaker from its housing.
- Remove the old foam or rubber surround.
- Glue the new foam or rubber surrounds in place.
- Replace the speaker in the cabinet.
- Test.
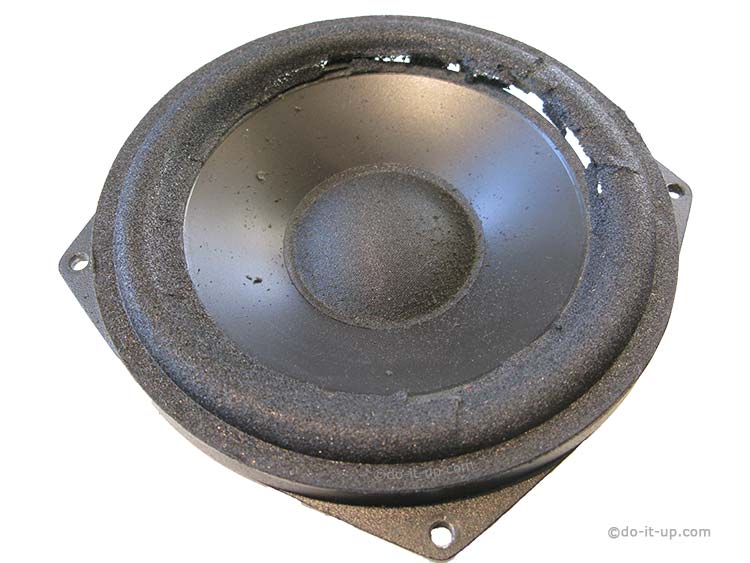
Here is an example of a blown speaker where the speaker foam surround has perished:

How to Check Your Speaker Foam Surround?
First off, remove the speaker grill. The grill can be attached by various methods:
Note – Don’t go poking the centre speaker cones, especially the dome (dust cap in the middle), as you could damage them (leaving them dented).


- Little push fit plug and sockets – These allow you to just pull off and push on (most common).
- Velcro – Just pull off, position and push on.
- Screws – Check the front and back of the speaker for these.
- The worst are speaker grills (normally metal) that have the edge turned over at right angles. This edge is recessed in a small groove around the outside of the speaker. To get the grill off, you have to gently lever the grill out (be careful, don’t stab yourself or the speaker with a screwdriver!). Don’t forget to check for screws before pulling it off!
When the cover is off, You will find a speaker or speakers, maybe a tweeter and sometimes a hole (to allow for air flow).
The speaker being removed from its cabinet:

Check the rubber / foam surrounds for damage. You can either play something and watch the speaker to see if the surrounding foam is damaged or gently examine with your fingers (see the video) – Do not poke the dome in the middle with your fingers, as you may damage it!
Preparing for the Repair:
Measure the size of the speaker foam surround:
You should be able to see the inner and outer edge of the speaker foam, or where it once was previously. The main measurements are across the outer edge of the speaker foam (OD). Then the inner edge of the speaker foam. If you have a choice of size when ordering, get the size that’s closest.
Some suppliers may offer more size options (with larger speakers). If you’re trying to get an exact match, You could try and measure the size of the bulge (that helps the foam surround flex) but it’s not essential.
Ordering new foam or rubber surrounds:

There are various places online that you can order the parts, you just have to do a bit of searching to find the right part. eBay is a good place to look, as several suppliers already sell parts in their eBay stores.
Removing the defective speaker from its housing.
If you are happy to use a screwdriver and a sharp knife, then you should be able to repair your speaker. Most are normally straight forward to take apart, with a few screws and a couple of cables to disconnect. Don’t forget to make a note of which cable goes where, or your speakers will be out of phase on re-assembly, (see the video as an example).
Removing the old foam or rubber surround:
Using your fingers, remove what you can of the old foam surround from the speaker. This will leave behind parts of the foam that were glued. These will need to be carefully removed with a scraper. Be gentle, you don’t want to damage the speaker, or poke your finger through the middle dome (dust cap).
The video below shows the speaker being repaired:
Speaker Re-Foaming – Part 3 – The Repair
Speaker Parts
If you’re not sure what you need, sometime it’s a good idea to have a look? The list below may give you an idea of what’s what’s available, what to look for and how much it costs…
Ordering Parts – Examples of what you can buy & how much they cost:
| Speaker Repair Parts | |
|---|---|
| Item | Location |
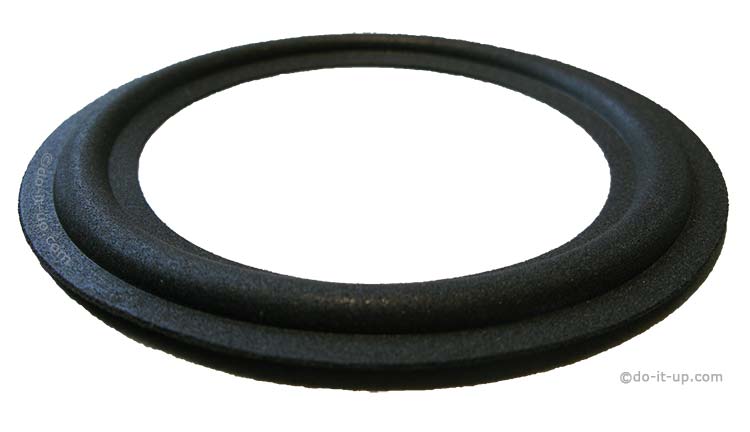
| Speaker Foam Rings. |  |
 |
|
 |
|
 |
|
| Glue. | |
|
|
|
|
|
|

Thank you for your support.
The Repair
This is the best bit. Getting the speaker back together again…
Glue the new replacement speaker foam or rubber surround in place:
When glueing the new foam in place you need to ensure it is glued centrally and the inner part of the speaker is central. This is not normally difficult, as the inner part of the speaker is normally fairly rigid. Do a trial fit before glueing.
Different people swear by different types of glue, so use what you feel most comfortable with. Here are some suggestions in case your not sure?
- PVA adhesive, commonly used as wood glue, arts and crafts etc – I have seen several comments saying that this is what they normally use on speakers. It takes a while to set but allows you to adjust things if necessary.
- Impact adhesive – Good if you want a fast result, but you have to make sure you position the foam surround in the right position first time.
Both the suggested glues are relatively flexible, which is good. Try and avoid glues that turn hard when dry, as they don’t have much give.
Glueing Method:
Slower Drying Glues:
With slow drying glue, you can apply all the glue and gently position the new foam surround. Apply the glue as per the manufactures instructions.
Do not pull or push the new foam surround (making it taught) when glueing, as you could pull the inner speaker off centre. It should be gently dropped in place on top of the glue. Leave to dry.
Faster Drying Glues:
You could apply all the glue and gently drop the foam surround in place. This is risky as you have to be quick and may not be able to re-position the foam once in place.
Or, you can glue one edge at a time, a section at a time. This will allow you to better position the foam surround when you first apply the glue (and helps to avoid kinks). Apply the glue as per the manufactures instructions. Do not distort the foam surround. Check the foam ring is correctly positioned before glueing the remaining edges. Leave to dry.
Do not pull or push the new foam surround (making it taught) when glueing, as you could pull the inner speaker off centre. It should be gently dropped in place on top of the glue, or an edge gently lifted if glueing around the circumference a bit at a time.
Faster drying glues (like an impact adhesive) can be a bit more ‘rubbery’. They have a bit more give. Should you make a mistake, you can sometimes gently tease the new foam surround off with a sharp knife (if you’re careful). See the section below – My Re-foamed Speaker Has Failed Test?
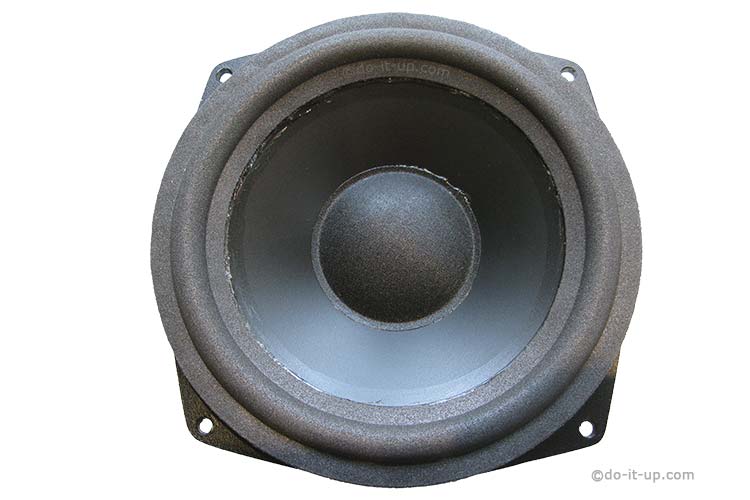
The speaker being re-assembled:
Speaker Re-Foaming – Part 4 – Re-Assembly
Replace the speaker in the cabinet.
Put the speaker gasket in place (if fitted). Attach the speaker connections, ensuring they are the correct way round (or the speaker will be out of phase). Fix the speaker back into the cabinet.
Testing:
Play some music, or a DVD and check for correct operation. Play different sounds, such as quite, loud, speech, bass, treble etc, and check they all sound OK.
Part 5 – The speaker re-foam video shows a speaker being tested after the foam has been replaced.
The speaker being tested:

Speaker Re-Foaming – Part 5 – Testing
My Refoamed Speaker Has Failed Test?
It could be that the foam surround is not central, or the foam is too stiff or soft?
Fault Symptoms:
Here is an example of the fault symptoms that could be found where the newly replaced foam is too tight or misaligned after repairing your speaker.
- Loud volume is good.
- Ordinary speech is good.
- Quiet speech was slightly muffled?
Solution:
I suspected that the new foam surround was restricting the speaker in some way, but only slightly due to the fault being at low volume. The only way to confirm this was to release the new foam repair from the outer edge of the speaker and try again.
With the speaker replaced in the cabinet (and failed test), carefully release the outer edge of the replacement foam from the speaker frame. (There is a danger that the new foam will become damaged by the process, so be careful).
With the speaker foam surround released, play some quiet, gentle sounds (do not turn the volume up!) and observe the speaker to see how it performs. I.e. The speaker moves freely without any obstruction.
As the speaker cone moved freely, glue a small section of the speaker foam surround (on opposite sides, so it’s balanced) whilst the speaker was still operating (using music that was soft and gentle on the speaker –
do not turn the volume up! ). A flexible impact adhesive (or grab adhesive) was used because the speaker was still operating and needed a relatively fast glueing method. Whilst this was being carried out, I listened to the speaker and observed its performance.
If you’re satisfied that the speaker still performs OK, with only a small part of the speaker foam surround attached, continue glueing the rest of the foam in place (on opposite quarters to maintain balance). All the while still listening and monitoring the sound of the speaker.
