The Best Washing Line (is it Unbreakable)?
There is nothing worse than all your nice clean washing ending up on the floor, when your clothesline breaks. Time and time again I’ve installed an ‘off the shelf washing line’, only to have it break a year or two later. You purchase a thicker stronger washing line, it may last a little longer, but it still breaks…
How can we fix this, so it never breaks?
How to Fix a Broken Washing Line?
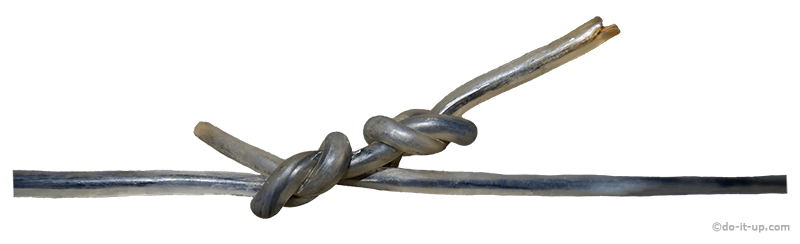
Tying a knot in a washing line is a great solution, but often it’s a temporary fix. Therefore, how can we repair a clothes line, so it never breaks? Read on to find out how…
What is the Strongest Washing Line?
An Unbreakable Washing line:
Forget ‘off the shelf’ washing lines. As many of them break after just a few years! Let’s make one that’s never gonna break! This article shows how I made a washing Line, and why I chose stainless steel wire. I’m going to use a straight, traditional washing line as an example, but the method I use here can be applied to any other type of washing line…
Things to consider:
Let’s Get straight to it:
- How to Make a Stainless Steel Washing Line:
- The Components:
- How Long do I Need?
- Ordering Parts:
- How to Put it all Together:
- Image Gallery:
What to Look for in a Strong Unbreakable Washing Line?
It Has to be Flexible (to go Around Pulleys and Things):
To be flexible, a clothesline has to be made of wire, rope (natural), or plastic rope (nylon, etc). Or, a combination of these. Most washing lines appear to be steel wire with an outer plastic coating. Natural products can rot and dirt can become ingrained within the fibres.
It Has to be Easy to Install:
Rope or wire is not usually difficult to install, it’s their ends that are the problem! We either have to be good at knots, or have a suitable clamp to hold the ends in place.
It Must not Rust, or Rot:
Unfortunately, many natural products will rot. Part of the circle of life (“Nants Ingonyama Bagithi Baba” which doesn’t mean ‘the circle of life’, but “Here comes a lion, father…”) Disney has a lot to answer for…
Whereas, steel or nylon may last a bit longer. Steel, will rust and break eventually (unless treated).
It Has to be Low Maintenance ‘fit and forget’:
OK, so…
- Natural products will probably rot:
- Steel will rust.
So, that leaves Nylon? Nope, because we have stainless steel wire (which doesn’t rust)… Horah!
Stainless steel wire and nylon are both good materials for a washing line. They both have their place, but I suspect stainless steel is going to way better, stronger, less stretchy and will probably harbour less dirt between the interwoven strands.
It has to be Reasonably Priced:
The washing line may be twice the price of an ‘off the shelf’ clothesline, but you only need to fit it once…
It’s Gotta Work!
Stainless steel has been used in marine environments for years. It is a good tried and tested product.
A Washing Line – How Strong Does it Need to be?
Well not that strong? We’re not going to use it to do pull ups from, or use it as a vehicle engine hoist. However, wetsuits full of water (while you wash them down) can be very heavy. How heavy is a full load of wet washing anyway?
Calculating the Unbreakable Washing Line Breaking Load:
A typical washing machine capacity for a medium to large family is about 10 Kg (22 Lbs). But thats when dry! The wet capacity could be double that, 20 Kg (44 Lbs). So four loads of washing (to cover for all eventualities, or four wet wetsuits?) would weigh about 80 Kg (176 Lbs). Buildings commonly use a factor of safety of 2.0. So if we use this, then our washing line needs to be capable of holding 160 KG (352 Lbs). So this is our minimum breaking load.
Here’s a Breakdown of how I Worked out a Washing Line Maximum Load.
(Which is also a minimum load for each component…)
| Calculating the Maximum Washing Line Load | ||||||||
|---|---|---|---|---|---|---|---|---|
| Item | Condition | Factor | Weight (Cumulative) |
|||||
| Kgs | Lbs | |||||||
| Washing machine capacity (Medium to large family) | Dry | – | 10 | 22 | ||||
| Wet | 2 x 10 | 20 | 44 | |||||
| Four loads on a washing line (to cover for all eventualities) | Wet | 4 x 20 | 80 | 176 | ||||
| Safety factor: | Wet | 2 x 80 | 160 | 352 | ||||
| – | Total: | 160 | 352 | |||||
Notes:
- I note (in my research), many of the ‘off the shelf’ washing lines don’t quote their load capacity. They just say ‘extra strong’, or ‘long lasting’…
How to Make a Stainless Steel Washing Line:
A stainless steel washing line should be no different to any other washing line. As with an ordinary clothesline, the correct size and type of wire needs to be selected.
The Stainless Steel Clothesline and its Components:
We have to consider what components are best to create the clothesline. This basically boils down to what type of stainless steel wire do we use and how do we fix the ends?
The Washing Line Wire:
There are different types of wire with different properties, therefore we need to choose the best wire to match the needs of a washing line. We need to consider…
Notes:
- Beware of wire with frayed ends. It can snag and stab you. Wrap with tape or something similar to protect yourself.
- You may need to consider the minimum thickness of the wire. The clothes pegs clamp, or ‘hang off’ the wire. Smaller wire may allow the clothes pegs to more easily ‘accidentally’ slip off the wire.
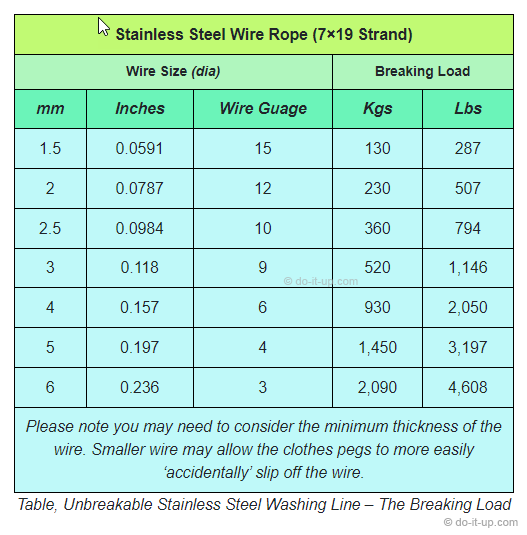
- The Breaking Load:
The breaking load is often dependant on the physical size of the wire. You can see how I calculated the ‘Unbreakable Washing Line Minimum Breaking Load‘ in the section above…
The table below shows the strength of stainless steel wire (7×19 strand),
dependant on the wire diameter.
| Unbreakable Stainless Steel Washing Line The Breaking Load – Wire Rope (7×19 Strand) |
||||
|---|---|---|---|---|
| Wire Size (dia) | Breaking Load | |||
| mm | Inches | Wire Guage | Kgs | Lbs |
| 1.5 | 0.0591 | 15 | 130 | 287 |
| 2 | 0.0787 | 12 | 230 | 507 |
| 2.5 | 0.0984 | 10 | 360 | 794 |
| 3 | 0.118 | 9 | 520 | 1,146 |
| 4 | 0.157 | 6 | 930 | 2,050 |
| 5 | 0.197 | 4 | 1,450 | 3,197 |
| 6 | 0.236 | 3 | 2,090 | 4,608 |
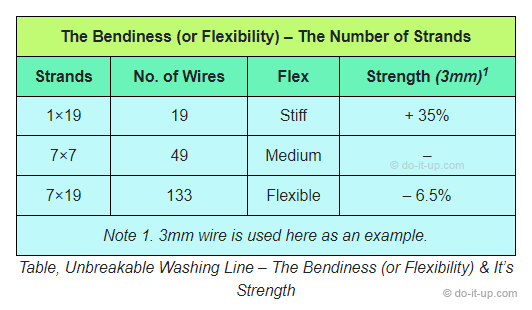
- The Bendiness (or Flexibility):
Why am I using 7×19 strand wire?
The flexibility of the wire is often dependant on the size and number of wire strands. As an example, 7×19 is 7 groups of 19 wires (133 strands). To gain more flexibility, you lose a little strength (see the table below).
Having flexibility is a good idea if you intend to raise and lower the washing line. Plus it also helps on windy days (a tree will bend in the wind to help stop it getting blown over). A slight loss in strength doesn’t matter, as long as it’s taken account of when selecting the wire.
The table below shows the bendiness (or flexibility) & strength of the wire,
dependant on the number of strands.
| Unbreakable Washing Line The Bendiness (or Flexibility) & It’s Strength |
|||
|---|---|---|---|
| Strands | No. of Wires | Flex | Strength (3mm)1 |
| 1×19 | 19 | Stiff | + 35% |
| 7×7 | 49 | Medium | – |
| 7×19 | 133 | Flexible | – 6.5% 2 |
2 Only a slight loss in strength…
- The Price:
The price tends to go up, dependant on the size and type of wire. In this case we’re using stainless steel (rust prevention), and a larger number of wire strands (to make the wire more flexible). However, the benefits outweigh the slight increase in overall material cost.
The Washing Line Components:
- Grips Clips or Clamps:
Grips, clips or clamps can to be used in place of tying a knot (as it’s not so easy to tie a knot in wire). There are various grips and clamps available. Some do a better job than others, and some have a better aesthetic appearance (please see the notes below).
In my case, I’m going to use all stainless steel to ensure the components are long lasting and require little (if any) maintenance.
Things to consider:
- How many grips, clips or clamps are required (for each end).
- The size of wire being used.
- Their strength (breaking load).
- Individual cost.
The table below shows the different grips, clips & clamps that can be used,
their cost rating, strength and how many are required (for each end).
| Stainless Steel Grips, Clips & Clamps for Wire Rope | ||||||||
|---|---|---|---|---|---|---|---|---|
| Item | Type | No. Req’ |
Size | Cost (A is low) |
Load Rating2 | Notes | mm | Inches | Guage |
| Grips or Clips: | = Best strength to price ratio. | |||||||

Grip1 |
x 3 | 2 to 25 | 0.0787 + | 12 + | B (x3) |
50% | Recommended min x 3 req. The top of the grip should always be against the wire end returned back on itself. | |

Simplex |
1 | 2 to 6 | 0.0787 to 0.236 | 12 to 3 | A | 50 % | For 7×19 wire (not plastic coated). | |

Duplex |
1 | 2 to 6 | 0.0787 to 0.236 | 12 to 3 | C | 80% | For 7×19 wire (not plastic coated). | |

Egg |
1 | 2 to 6 | 0.0787 to 0.236 | 12 to 3 | F | – | For 7×19 wire (not plastic coated). | |
| Clamps: |
 Clamp
Clamp
|
1 | 1.5 to 3 | 0.0591 to 0.118 | 15 to 9 | G | – | For low weight items such as a garden trellis, etc. |
 Clamp (Heavy Duty)
|
1 | 3 to 8 | 0.118 to 0.315 | 9 to 0 | N | – | For heavier weight items such as industrial light fittings, etc. | |
1 Sometimes reffered to as a Bulldog Grip.
2 This is the % of the breaking load.
Notes:
- When searching for grips (clamps), beware of the search terms you use. Grips (clips) and clamps are slightly different things, plus make sure you also use wire rope in the search term to get the correct type.
For safety:
- Always use a proper grip, clip or clamp that’s designed for use with wire.
- Some specifications require more than one clamp on each end.
- Beware of wire with frayed ends. It can snag and stab you. Wrap the ends of the wire with tape or something similar to protect yourself.
- If using wire for lifting or pulling, always read the component specifications, as there are specific safety requirements for lifting and pulling.
- Connections:
There are two types of connections. Each may use a different set of components:
Permanent Connections:
Things to consider:
- Wear and tear. Is there any part of the connection that could chafe and wear?
- To make a connection, the wire is often ‘looped back’ on itself. Will there be a load that causes this’ loop back’ to become tighter? (this may cause the twisted wire strands to splay out and the wire could lose some of its strength)?
Removable Connections:
Things to consider:
- Wear and tear. Is there any part of the connection that could chafe and wear?
- To make a connection, the wire is often ‘looped back’ on itself. Will there be a load that causes this’ loop back’ to become tighter? (this may cause the twisted wire strands to splay out and the wire could lose some of its strength)?
- How can the wire be easily connected and disconnected from the washing line supports?
Washing Line – How Long do I Need?
The famous phrase “How long is a piece of string” can also be applied to washing lines…
When measuring the length of a washing line, additional length needs to be added for:
- Looping the wire back at the ends.
- Any pulley systems.
- Raising and lowering the washing line.
Ordering Parts:
If you’re not sure what parts you need, sometimes it’s a good idea to have to look at what’s available? The tables below may give you an idea of what you can get, what they look like and how much they cost…
Ordering Parts – Examples of what you can buy & how much they cost:
Table of Parts To Make a Stainless Steel Washing Line:
| How to Make an Unbreakable Washing Line How Much do Parts Cost? |
|
|---|---|
| Item | Location |
|
Wire Rope (Cable)
Stainless Steel – 7 x 19 Strand (flexible) – (For strength & flexability) |
 UK Prices
|
 US Prices
|
|
 AU Prices
|
|
 CA Prices
|
|
 IE Prices
|
|
|
Grips, Clips or Clamps Stainless Steel – 7 x 19 Strand – (See the table Stainless Steel Grips, Clips & Clamps for more detail) |
UK Prices
|
|
US Prices
|
|
|
AU Prices
|
|
|
CA Prices
|
|
|
IE Prices
|
|
|
Shackles, Thimbles, Carabiners & Quick Links
Stainless Steel |
UK Prices
|
|
US Prices
|
|
|
AU Prices
|
|
|
CA Prices
|
|
|
IE Prices
|
|
Thank you for your support.
How to Put it all Together:
It’s fairly straight forward, dependant on the wire grip or clamp used. Tools, you may need a small spanner, or an allen key.
Image Gallery:
– click or tap the image to view full size –